Sunday, December 30, 2007

Pistachio, Lime & Cheesecake Tart


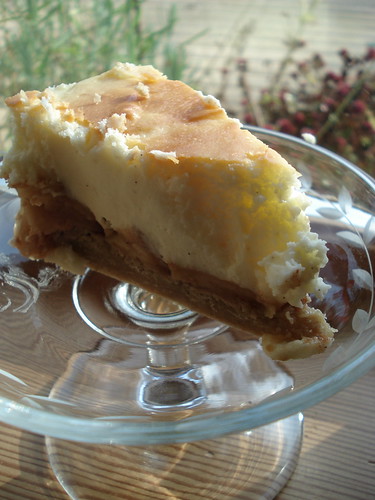
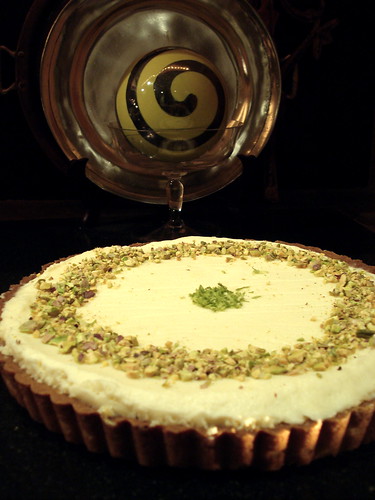
Is it just me or did Christmas come, and go, rather quickly this year? As much as I adore the Holidays I feel as though I didn't get much time to prepare, and therefore, little time to really enjoy Christmas. Any free time I have leading up to and during the Holidays I generally spend in the kitchen feverishly baking. I usually hold at least two big parties, and have many people in and out of the house for drinks, hot cocoa , or to watch old Christmas movies and bake cookies. This year I only had one real party at the very beginning of December, I didn't watch one Christmas movie, or to my horror bake one batch of Christmas cookies. I'm actually a little depressed about how un-fabulous the Holidays were in this sense. I did get to spend time with the people I love, and I saw one of my dearest friends I haven't spent time with in years. I also had quite a bit of time off, and relaxed. But it still just didn't feel like Christmas. We didn't even cook a Christmas dinner, we simply ate a gaggle of appetizers. I had, however, slightly prepared a dessert. You see a few days before Christmas I took our billing company a plateful of almond rocca cheesecake bites, and I had enough cheesecake batter leftover to make a nice thin layer of the creamy smooth stuff. Coincidentally, around the same time, my mother handed me a page torn from a magazine that displayed a beautiful lime and mascarpone tart with pistachio crust. Since I didn't have any motivation to go to the store, or to follow a recipe, I decided to make something of my own with my leftover cheesecake batter, the limes I had lying about the house for cocktails, and wouldn't you know it, the giant bag of pistachios one of my colleagues gave me for Christmas. No trip to the store required!

I started out by whipping up my favorite tart crust recipe, which generally calls for almonds, however I substituted the almonds for beautiful little green pistachios. Next was the very simple, but a little time consuming, and sweat inducing (you try standing in front of burner under hot stove lights for 15 minutes whisking your little heart away without breaking a little sweat) lime curd. And perhaps the easiest of all was pouring my leftover batter into my spring form and popping the sucker in the oven. All that was left to do, after the cooling of each component of course, was assembling. Easy peasy. And viola, you have yourself a delicious, and fairly uncomplicated dessert. And with accents of green nonetheless, perfect for a little Christmas cheer.

Recipe: Pistachio, Lime and Cheesecake Tart

What you will need for the tart crust:

1 stick plus 1 Tb. butter, cut in small pieces
1 1/4 cups flour
1/4 cup pistachios
1/2 cup powdered sugar
1 egg yolk

Tart Crust Directions:

1. In a food processor, pulse all the dry ingredients.
2. Add the butter and pulse again.
3. Add the egg yolk and pulse until the mixture comes together in a ball. (This step is SO COOL!)
4. Wrap in plastic and refrigerate as you prepare the filling.
5. Roll between sheets of plastic wrap and lay over tart pan, cut off any excess and press crust firmly into crevices.
6. Bake at 350 for about 10-15 minutes or until golden brown.

The dough likes to puff up, so either keep an eye on it and pat it down with the back of a spoon, OR fill the pie with beans (with a layer of parchment between the beans and crust of course) to prevent puffing.

Tuesday, December 18, 2007

It's a Marshmallow World for this Gingerbread House


My "Gingerbread" House., originally uploaded by razzieswirl.

Every year we get a group of people together and make "gingerbread" houses. I use quotations because as you can see it's not really gingerbread, it's graham cracker. I'm not particularly fond of gingerbread, not that it matters in the case of gingerbread houses because you generally don't eat them (at least in our house), the sugar glue taste pretty god awful. 

This year we had a beautiful dinner party for our dear friend Skylers birthday, and just like last year, this year for his birthday we made gingerbread houses. Last year I spent over $50 on candy (I know, I know, whoa), so this year I requested everyone bring two bags of candy, and I only ended up spending about $7-$12 on candy. Skyler is one of those people who will not, no matter how I fight, partake in any crafty activity. He will not carve pumpkins, he will dye Easter eggs (okay I convinced him to do Easter eggs once, and they were less than "appropriate" but that's a story for another day). I can, however, get him to make gingerbread houses. Why? I don't rightly know, perhaps it's because if you can make a structure that doesn't cave in on itself, all you really need to do is glue a bunch of candy to the outside and viola! you have a house. Most houses look likes piles of candy (at least in our house), so there is no anxiety about having to be toooooo creative (like carving a pumpkin is ). But he likes it, and I'll take anything I can get him to do with me that's crafty! It was overall a lovely and extremely fun night. We ate delicious food, had fun gluing candy to graham cracker shacks and did a little dancing, woot! woot!

The picture above is my "gingerbread" house. I feel that the yard is just as important as the house itself. Just think, when you drive by a house with a flat, square, brown yard, you're generally less than impressed. But my house boasts a marshmallow world, a yard of fluff and white, a red brick path that greets you with large red lanterns, a yard flanked by towering green gumdrop trees and a tiny cookie shack out front adorned with a little green wreath. I know if I were sitting in front of a cozy little fire in my "gingerbread" house I would greatly enjoy the lovely view from my little windows. I can just hear Dean Martin crooning "It's a marshmallow world in the winter. . . " can't you? 

I am also posting all the other houses created here on Saturday night. They make up a pretty fine neighborhood. And one of the things I love about gingerbread houses, for the same reason I probably love carving pumpkins, it's most fun to see how unique each house is. Everyone has their own idea of structure and decoration, it's amazing to see what everyone does. 

This post is my entry in the YumSugar Gingerbread food blogging event as well. I'm so looking forward to what other people are going to be submitting for this event to. Check out YumSugar and the gingerbread event at : http://yumsugar.com/824036

And if you haven't made your own gingerbread houses yet, I hope this event, or my post will inspire you to sit down with some of your loved ones and create away!

Happy Holidays!

Thursday, December 13, 2007

Gorgonzola Pear & Honey Crostini


Wow. 
These are amazing. And oh-so easy! If you have a few people coming over for a glass of wine and you want to put more on the table than a bowl of nuts and some slices of cheese, keep these in mind. You don't need to purchase many ingredients (try 3, not including olive oil, since everyone should have large bottle of that lying around), and whips together in a matter of minutes. Plus, everyone you will serve them to will love them. They're salty, tangy, smooth, crunchy and warm. The gorgonzola has such a pungent flavor, the pear is slightly crunchy, cool and sweet, the honey is drizzled atop a thick slice of hot gorgonzola fresh out of the oven. You know when you put peanut butter on a hot piece of toast fresh out of the toaster and it gets all melted and gooey, and if you put a light drizzle of honey on top of the warm melted peanut butter how the honey becomes one with peanut butter, but it's light sweet taste lingers? It's the same idea, but with cheese and pear. You don't even need to know your way around a kitchen to whip these tasty delights up. I've made these on several occasions and every time they've been a hit, and they don't last very long! 

Recipe: Pear, Gorgonzola and Honey Crostini

Ingredients: 

1 baguette sliced (each slice about 1/2 inch thick)
1 healthy block gorgonzola - sliced
1 ripe anjou pear (or other favorite pear) - sliced 
A jar of fresh honey
Olive Oil

Directions:

1. Preheat oven to 375 F

2. Arrange the sliced baguette on a baking sheet and drizzle with olive oil

3. Toast in the oven until only slightly turning golden brown (about 5 minutes)

4. Remove bread from the oven and top with a slice of pear, then a slice of cheese. 

5. Put the tray back in the oven and toast another 3-5 minutes until gorgonzola has warmed and melted a bit. 

6. Remove from oven and immediately drizzle with honey (the crostini need to be extremely hot, so that the honey will glaze the top of the crostini).

7. Serve on a pretty platter, and start another batch pronto, you'll need more, trust me!

Enjoy! 

Yummmm!!

Sunday, December 02, 2007

Cheesecake Extrodinaire


I had a lovely Thanksgiving that consisted of all the staples: Turkey, buckets of stuffing, mashed potatoes galore, the best green bean casserole on earth (no canned mushroom soup here), roasted sweet meat squash, and of course plenty of homemade cranberry dressing. Thomas' sister Rayne joined us out at my mothers. We spent the day (and most of the evening) drinking tea, lounging in front of a roaring fire, listening to soft music and playing games. It was such a delight to have Rayne with us this year, we both love her to pieces. Going out to my mothers is like going on vacation, you're out in the middle of nowhere (or at least it feels that way), it's quiet, and her house is so lovely it feels like you're at a fancy resort. Her house is practically all large windows (or at least that's what it feels like), and so you feel as though you're outside amongst nature, when in fact you're sitting in front of a roaring fire, on a plush sofa, covered in the softest of blankets, lounging like our pugs do. It's simply the greatest. 

This year she asked me not to make a heavy dessert, since the dinner is always very heavy. I mulled it over in my head for about a week and finally said "Screw that, I'm making cheesecake". I knew she wouldn't object in the end, and she didn't. Pumpkin cheesecake is fairly popular option around turkey day because it reminds us of pumpkin pie (which I dislike anyway) in a creamier, sweeter sort of way. I've done pumpkin cheesecakes before, ginger snap crusts and all, but decided I wanted to combine MY favorite pie, apple, with cheesecake. I adore my apple pie because it doesn't have a top crust, I always top apple pie with a mixture of melted butter, brown sugar, flour and oats. It's like a crunchy yet chewy giant oatmeal cookie atop a sweet, tart, sticky apple center. I wanted the same flavors and textures but mixed with a cool, thick creamy vanilla bean cheesecake. 

I really had no recipe, in fact, I did my apple pie upside down, in a way. I made my crumb topping except I added some additional flour and oats to bind it a bit more and make it more crust like and less crumbly. I cooked the apples in the same manor I cook them for apple pie. I then topped it all off with a creamy vanilla bean cream cheese mixture. 

I'll post my crumb topping/crust recipe and the apple pie filling recipe. I won't post a cheesecake recipe as a lot of people seem to have their favorites and mine is a guarded family secret. 

Recipe: Brown Sugar Oatmeal Crumb Topping (Or Cheesecake crust)

Ingredients: 

1/2 cup or 1 stick of unsalted butter
1/2 cup brown sugar
1 cup flour
1/2 cup of oats 

Directions:

1. Melt butter
2. Add sugar, flour and oats, mix thoroughly. 
3. Top a pie, or press firmly into the bottom of a springform pan for crust.

Recipe: Apple Pie Filling

Ingredients:

4 honeycrisp apples
1/2 cup or 1 stick of butter
1/4 cup white sugar
1/4 brown sugar
2 tsp. good cinnamon (adjust according to taste)
1/4 tsp. clove
1/4 tsp. nutmeg
1-2 TBL. flour

Directions:

1. Melt butter in a large sauce pan
2. Add apples, both sugars, cinnamon, clove and nutmeg. 
3. Cook this mixture over medium low heat for 10-15 minutes or until apples begin to soften and mixture caramelizes a bit.
4. Add flour to thicken. This should give you a nice mixture of apples and a cinnamon/sugary gooey sauce. 
5. Add this to a pie shell or place atop oatmeal crust for cheesecake.

To make cheesecake, top with your favorite cheesecake recipe and bake according to cheesecake directions. 

Amazing!

Sunday, November 18, 2007

Riskrem: The Ultimate Norwegian Comfort Food


Riskrem., originally uploaded by razzieswirl.

Photo Sharing and Video Hosting at Photobucket


This is my entry for the Festive Food Fair of 2007, which honors global and festive food, hostd by Anna at Morsels and Musings. I still haven't learned the "clean" way to link back to a website, so you'll find a long link at the bottom of the post so you can head over to Morsels and Musings and check out the roundup starting December 10th! Enjoy!

As I've mentioned in previous posts, I grew up in a very Norwegian household, I've been to Norway, and I'm extremely proud of the Norwegian within me. In fact, I feel 100% Norwegian (even though in reality I'm also 25% Irish and 25% German, just don't tell anyone). I believe that Norway and everything within it, is possibly the greatest country in the world. 

Alright enough blatant Norway loving and onto the recipe. Riskrem or Rice Cream is a wonderful traditional norwegian dessert. It's creamy, sweet, smooth, light, fluffy and a little chewy. It's generally served at Christmas and sometimes there is a whole almond hidden within it's creamy depths. Whoever finds the almond gets a prize, generally a marzipan pig. I hated the way marzipan tasted as a child but I loved the little pink marzipan pigs with their little chocolate eyes. So whenever I received a pig for x-mas my grandmother would put in the freezer and take it out every so often so I could oogle it for a while, or, as much as I hate to admit it, pet it a bit. After a month or so of this, in the trash it went. 

Riskrem is delicious, I urge you to make it! It's really simple and is so light and fluffy. It's really nothing like rice pudding, so if you don't like pudding, or rice pudding I think you'll like it. It's not thick like traditional pudding, a generous helping of sweet whipped cream makes this dessert extremely light and airy. And if you do like pudding or rice pudding, you will surely like this stuff. I've never met a person who doesn't like Riskrem. Just be careful, the bowl can dissapear quickly. Riskrem is made by cooking down milk and pearl rice for a very long time, adding sugar, (I added vanilla bean too) and a little salt. You then let this mixture cool in the fridge. Once the rice has cooled enough you add a generous helping of freshly whipped cream. Viola! You have a wonderful yellow bowl full of fluffy sweet dreamy dessert goodness. 

Recipe: Riskrem

3/4 cup pearl rice
1/4 tsp salt
1 qt. milk
1/2 cup sugar
1 tsp. vanilla (you could also use almond) extract
2 cups heavy cream, whipped and sweetened to taste
1 whole almond (optional)
Berry Sauce (traditionally lingenberry) also optional

Directions:

1.Cook rice, salt, and milk in double boiler until rice is soft and mixture is thick - about 1-1/2 hours to 2 hours.
2. Add sugar and extract. 
3. Chill until thoroughly cold. 
4. Add optional almond. 
4. Stir in whipped cream. 
5. Serve with a red fruit sauce (lingenberry, raspberry, etc.). 

Serves appx. 8.

Enjoy!

A quick disclaimer: The photo shown in the post is the riskrem cooling, the whipping cream has not been added yet. 

Check out the roundup and the lovely Morsels and Musings blog at: http://morselsandmusings.blogspot.com/2007/10/festive-food-fair-2007.html

Saturday, November 17, 2007

Pink Champagne Cupcakes.


Pink Champagne Cupcakes., originally uploaded by razzieswirl.
I made these for Sarinas 23rd Birthday this year.
New Years Eve Pink Champagne Cupcake recipe from Gail Wagmans Cupcakes Galore. I don't feel right posting the recipe, I would probably be infringing on copyright laws.

I will be opening an Esty Store where you can pick up beauties like these wonderful monogram cupcake toppers. . . cute huh?

Saturday, November 03, 2007

Belated Halloween Well Wishings


I've been so bogged with homework lately I feel as though I haven't been able to properly focus on my adventures in the kitchen. I've even been so busy that I was unable to post a quick "Happy Halloween" to everyone, which is sad because it is one of my all time favorite holidays. 

I hope you had a magical, mysterious and possibly spooky Halloween!

Thomas, Sarina and I devoured cupcakes at Trophy Cupcakes at the Wallingford Center in Seattle. When I was a little girl my mother worked at a printing shop in Wallingford; that old little school house filled with shops and delicacies holds a very special place near and dear to my heart. Since early childhood I've been eating cake. Cake in all forms, sheet cakes, layer cakes, wedding cakes, norwegian cakes, and most of all cupcakes! My grandmother was an avid baker, so much so that she worked in a little bakery in Seattle for many years. I know cake. However, I would say never in my life, or in my travels, have I ever tasted cakes as delicate, sweet, moist, airy and dense (yes at the same time) as I did when I ate a Trophy Cupcake. Alright, make that six Trophy Cupcakes (not all at once mind you, oh lord no, I would've been sick)! Each one was more amazing, and ooohing worthy as the last. 

If you're in Seattle a stop at Trophy Cupcakes is a MUST on your to do list. Trust me, you will thank me for the amazing cake-gasm you will experience. It's like a religious experience! And if my description hasn't convinced you, just check out the pictures above and below for yourself. Or check them out online at: www.trophycupcakes.com


Tuesday, October 16, 2007

Drunken Apples.


Red Wine Apple Cobbler., originally uploaded by razzieswirl.
This is my first participation in a Sugar High Friday event, and to be completely honest, I'm a little nervous, ok seriously nervous. Even before I entertained the idea of my own food blog, I spent hours on end exploring the extremely vast world that is the food blog-o-sphere. Hours turned into days, and months. I was so obsessed with food blogs my boyfriend actually became jealous of my poor little ibook. Sugar High Fridays is one of those events you come across on some of the most amazing food blogs out there. . . It's a popular one people! I feel like I'm playing in the big leagues. Can my blog handle it? Is it good enough? Is it worthy? I surely hope so!! 

When I read what this month's theme was: Drunken Apples, I knew exactly what I wanted to do right away. We were asked to prepare a dessert featuring apples and some form of alcohol as the main ingredients. I hope my dessert isn't too cliche, but when the wind is blustering outside my window, and the yellow, orange, and red leaves and blowing by I can't help but crave a good old fashioned apple cobbler. Apple cobbler is something I mastered as a very young adult, it was easy to throw together, the ingredients are readily available and generally always in the pantry. I've perfected it over the years. One of my dearest friends mothers once showed me that cooking apples over the stovetop with butter, sugar and cinnamon before filling an apple pie makes the best apple filling possible. 

I knew I wanted to adapt my cobbler recipe to include booze, I knew something stronger than a good glass of red wine would probably be a bit much for the ooey gooey filling, so I went to my local grocery store and picked up my favorite fall red, Gnarly Head. It's has sweet undertones of cinnamon and clove, puuurrfect base for my entry. 

I present to you Red Wine Caramelized Apple Cobbler with a Crunchy Brown Sugar Oatmeal Crust topped with Goldschlager Honey Whip Cream and a sweet Red Wine Reduction. . . whew, what a mouthful, seriously!

This was beyond amazing, it exceeded my expectations, in fact, I might even say I enjoyed it more than any apple pie or cobbler I've ever made. It was rich, but had a bit of a kick, the wine reduced beautifully. The flavors were complex, rich, and very deep. It was like a wine party in my mouth, a nice sweet, warm, comforting wine party. The whip cream offered a nice light, barely sweet, creamy contrast to the crunchy warmth of the sugary red wine oatmeal cobbler. Mmm mmm good!

I don't have a recipe for my original cobbler recipe, I've been doing it so long it just kind of comes naturally. But I did try to measure this to the best of my ability. But my suggestion, as is a given in cooking, if something tastes like it needs an adjustment (generally cinnamon), adjust to your personal taste. 

Recipe: Red Wine Caramelized Apple Cobbler with a Crunchy Brown Sugar Oatmeal Crust topped with Goldschlager Honey Whip Cream and a Red Wine Sugar Reduction

Serves 3

Recipe: Red Wine Apple Filling

Ingredients:

4 large honey crisp apple, peeled and thinly sliced
2 TBL unsalted butter
1/2 cup red wine (I used Gnarly Head Zin)
1/2 cup white sugar
2 TBL ground cinnamon
a few dashes of ground clove
2 TBL flour (for thickening)

Directions:

1. Melt butter in a large saute pan.
2. Add all remaining ingredients, except flour. 
3. Cook ingredients over medium heat for about 10 minutes. 
4. If necessary add little bits of flour to really thicken the sauce up.
5. Place apples in prepared ramekins. 
6. Place some of the red wine reduction filling aside (I had a bit extra)

Recipe: Oatmeal Topping

Ingredients:

1/2 cup unsalted butter softened
1/2 cup light brown sugar
3/4 cup flour (maybe a tad more)
1/4 cup oatmeal (maybe a tad more of this too)

Directions:

1. Combine butter and sugar well.
2. Add flour and oatmeal. 
3. You're looking for a nice crumbly consistency that still holds it shape a bit. 
4. Top apple filled ramekins generously with crumble topping

Bake ramekins in 375 degree oven for 1/2 hour until oatmeal topping is golden and crunchy and the red wine is bubbling up over the edges. 

Recipe: Goldschlager Honey Whip Cream

Ingredients:

6 oz. heavy whip cream
1 TBL honey
1/4 tsp. goldschlager

Directions: 

1. Mix all ingredients in a mixer and whip on high speed until fluffy. 

Assembly:

Top warm, gooey red wine apple cobbler with a generous dollop of whip cream. Curl up in somewhere extra comfy, and enjoy! 

And a special thank you to Spittoon Extra for hosting this wonderful event (check out Spittoon Extra: www.spittoonextra.biz/ (sorry I am still trying to learn how to post a link you can click on, and not one you have to copy and paste, any suggestions, feel free to let me know how to do this). Alcohol and apples were a great paring, and perfect for the season too!

Thursday, October 11, 2007

It's National Meatloaf Day Everybody!


It's Not Burnt!, originally uploaded by razzieswirl.
On October 18th, that is.

So, this is my first participation in a food blogging event! It's fitting that it's meatloaf because we love to make meatloaf at our house. Well, to be honest with you, we generally make turkey loaf. It's not the greatest texture, but I enjoy that it's lighter both in fat and for the tummy. We don't eat a lot of red meat, it's not necessarily intentional, I just didn't grow up eating a lot of meat. And Thomas grew up eating mostly frozen or canned food, so anything that isn't in one of those categories he loves!

This recipe is from The Icon in Seattle. One of my favorite restaruants. The cocktails are simply divine, and their fried mac and cheese squares are devilish! Last week I finally tried their meatloaf, something I'd been meaning to do for years. I really enjoyed it! Okay, I've drawn it out long enough, you're probably wondering what IT is? 
Bacon Wrapped Molasses Glazed Individual Meatloaves with Corn and Cilantro Mashed Potatoes and Blackstrap Gravy! Whoo, that's a mouthful. Literally! Well, suficed to say, I loved it! It was delicious, tangy, salty, a little sweet, and anything wrapped in bacon is an A+ in my book, am I right? The potatoes are equally satisfying. And the gravy is just the cherry on top. It's thick, salty and pretty darn sweet. 

A few days ago I came across National Meatloaf Day hosted by Serious Eats. I decided I wanted to re-make the Icons recipe, and as luck would have it, I came across their recipe. Thank you Fine Living Network. Although I could've come up with a very close recipe, I wanted to see how they did it. 

I suggest giving this recipe a try. There's nothing better than curling up in a comfy chair on a cold autumn day with a good rib stickin' meal. Okay, well maybe, curling up on an autumn day in a comfy chair with a rib stickin' meal while watching Twin Peaks. . . 

Delish!

Recipe: Icon Meatloaf with Blackstrap Gravy

Ingredients:

8 slices apple smoked bacon 
2 lbs. lean ground beef 
2 Tbs. ketchup 
1/4-cup mayonnaise 
2 Tbs. shallots, minced 
1/4-cup fresh bread crumbs 
2 tsp. salt 
1 tsp. Tabasco sauce 
1 cup meatloaf glaze (recipe follows)

Instructions:


Fill a large saucepan with water and bring it to a boil over high heat. Add bacon to boiling water and blanch for 30 seconds. Remove blanched bacon from water and set both bacon and water aside. 
Preheat oven to 375F. 
In a large bowl, mix ground beef with ketchup, mayonnaise, minced shallots, fresh bread crumbs, salt and Tabasco. 
Divide meatloaf mixture into four equal portions and shape each one into a football shape. Wrap each individual meatloaf with three slices of blanched bacon and place it seam-side down on a baking sheet. 
Bake meatloaves for 20 minutes. Liberally coat loaves with meatloaf glaze and bake 10 minutes more. 
Serve with sweet corn, mashed potatoes and Blackstrap Gravy.
Meatloaf Glaze and Blackstrap Gravy

Ingredients: 
3/4-cup ketchup 
1/4-cup dijon mustard 
1/4-cup brown sugar 
1/4-cup molasses 
2 tsp. whole yellow mustard seed 
1 tsp. Worcestershire sauce 
1/2 tsp. Tabasco 
1 cup brown veal stock 
2 Tbs. additional molasses

Whisk together all ingredients except stock and additional molasses to make the glaze. To make the blackstrap gravy, combine 1/2-cup glaze with stock and additional molasses and heat gently in a small saucepan. 

Recipe: Corn and Cilnatro Mashed Potatoes

4 yukon gold potatoes
1 cup corn soaked in hot blanched bacon water
1/8 cup finely chopped cilantro
3 TBL butter
1/8 cup milk

Boil potatoes. Drain and add butter and milk. Mash well. Add corn and cilnatro and mash to combine. 

Enjoy!

Not a Food Post. A Thank You!


Yellow Around the Edges., originally uploaded by razzieswirl.

Okay, so I know this picture is not relatable to food. Unless it counts that while I'm riduculously full of goodies and laying in bed thinking of my next kitchen adventure this is what I look at?!

I just wanted to say I JOINED THE FOODIE BLOG ROLL! Yay! I'm so glad I found it. I've noticed a few comments on the postings and you don't know how excited that has made me, keep them coming, they're encouraging and oh-so exciting to read! I absolutely adore them!

Thank you everyone for taking the time to check me out, and taking even more time to leave me a comment, it's super lovely!

I will actually have time tommorrow to post what is missing, so come back for those recipes you've been waiting for! I'm done with homework for the week (double yay!) Plus, I have my submissions all set for the next (and my first) Sugar High Friday, and National Meatloaf Day! Whoopee! My first few food blogging events, and new people and comments, all in the same week? I'm such a lucky girl!

Thanks again everybody!

m.

Friday, October 05, 2007

Fit for any Tea Party!


Cinnamon Macro., originally uploaded by razzieswirl.

I'll be posting this recipe, and the others below it this weekend. As soon as I finish my essay on The Iliad, and Greece (I've got my fingers crossed to have it done tonight).

Delicious Apple, Maple, Cinnamon Cupcakes (*cough* muffins) with a light cinnamon sugar crust on top! YUM!

Monday, October 01, 2007

Reinvented.


Reinvented, originally uploaded by razzieswirl.

Delicious fall inspired lasagna roll ups. I'll be blogging soon. I'll be done with homework Wednesday.

Ok guys, I'm going to try to give this a go. It's got a lot of ingredients and components. I'm going to be quick with description, and perhaps a little choppy with components. It's a bit much. But really, really worth it. So many lovely flavors. I've hated squash since I was a little girl, but I can't get enough of this sweet meat sqaush. I don't know if it has a "technical" name, or if you can find it outside of Bellingham. It's from a local farm here in town, and the sign says sweet meat, and all the people at the grocery store seem to have some history with the stuff, so I'm going to assume the sign and the people are correct in calling it sweet meat. So if you can find it, seriously, buy it, roast it and give a whirl. It's very worth it, this coming from a girl who's still a little skeptical about squash!

Alright let's get this started.

Now, as I'm sure you can assume, you need to boil some lasagna noodles. I boiled about ten. Al dente, of course!

Okay, first of, the sauce.

Sauce: Red Bechamel

Ingredients;

2 TBL butter
2 TBL flour
2 1/2 cups fat free half and half
2 TBL tomato paste
1 teaspoon salt
2 TBL salut cheese

Directions:

1. Melt butter in a saute pan.
2. Add flour and allow to cook for 1 minute until bubbly.
3. Slowly whisk in the half & half and allow sauce to thicken
4. Add tomato paste, salt and cheese. Whisk until mixed.

While typing up the sauce I've been trying to figure out how to organize the fillings. What I'm going to do is list for you the ingredients that were rolled up into it and break down for you how it was all put together.

What to put in the rolls:

- fresh Spinach
- shredded rotiserrie chicken
- roasted mashed sweet meat
- caramelized onion
- salut cheese
- mozarella

trust me, once you've stuffed one noodle full of a little bit of each and some sauce, you'll be hard pressed to roll it up neatly. My suggestion, wet the end of the noodle when your ready to roll it up, it will stick better to itself this way. Stick these babies in a ceramic oven dish, top with a dollop of salut and a sprinkle of mozarella, stick into a 375 degree oven until warm and gooey, about 25 minutes.

Divine!

Enjoy!

m.

Tuesday, September 25, 2007

A Real Sunday Dinner.

We eat a lot of dinners in the TV room, plates in our laps. Even on Sundays. So it was a real treat this Sunday, when we made a real Sunday dinner, the kind grandma used to make.

I'll post more later. I've been busy with a ton of homework. And if I can get in bed before midnight tonight I'm going to take that opportunity!

Sorry it took me so long to update.
So, I've been trying to eat healthier lately, and I got this recipe off of Cooking Lights website, I've been making a lot of their recipes, because then dinner isn't so sinful all of the time. Since it's 2am and I'm continually swamped with homework I will simply give you a link to the recipe.

It's really delicious and worth a try, I suggest using sweet meat squash, it's the BEST. I also used 2 leeks instead of fennel bulbs. I enjoyed my alterations, but feel free to try the original first.

http://find.myrecipes.com/recipes/recipefinder.dyn?action=displayRecipe&recipe_id=226726

Enjoy!

A True Autumn Sandwich.


Ultimate Panini., originally uploaded by razzieswirl.

This sandwich has a bunch of fall-y ingredients, brie, fried pancetta, spinach, onions caramelized in apple cider. All stuffed in between two peices of Avenue's Pain Rustica, a slightly wheat thick rustic bread. Then it's all thrown in the panini grill and grilled to ooey, gooey perfection. The first heavy cold autumn night meal we've had. And we enjoyed on the first day of fall.

To be honest, I don't think I need to give you a reipce for a grilled sandwich. I love sandwiches because you can put absolutely anything inside them, and they generally always turn out amazing. I think they're even better grilled, the more oozey your cheese, the better!

This was a killer combo. Give it a try!

Any questions? Email me.

Friday, September 21, 2007

Autumn Has Arrived.

Wishing everyone a wonderful Autumn Solstice.
We celebrated by eating some delicious brie, pancetta, spinach, and caramelized onion (caramelized in an apple cider) panini's.
I think I might make an apple pie tomorrow. . . we'll see.
I just wanted to post a little something to welcome my favorite season before the bewitching hour!
Hope it's a magical (and productive) one!

Sorry about the picture. It's an old one. Most autumn related photo I had in my iphoto library from last fall (pumpkins, crows, a dead tree etc can't get much closer than that).

Sunday, September 16, 2007

Hands Down.

Best. Burger. You. Will. Ever. Eat.
Hands Down.
Period.
Seriously.

I will post story/recipe tomorrow.
A very special thank you to Lauren, who brought these delicious green chiles back with her from New Mexico. . . without them this burger would've been half as great.

Update: Alright, so I've had green chiles from New Mexico at least twice this week, and it's only Tuesday. I'm sad we don't have New Mexican green chiles up here, because I now believe they are a staple in any decent southwestern, mexican, hell just plain any dish (Lauren and Asher have even made green chile fettuccini)!

These burgers are really simple, I highly suggest giving them a go. If you don't have access to the best green chiles on earth (ie Chiles from New Mexico) I'm sure you can find a nice green even red pepper that will suffice. You're going to want to find something that has a spicy sweetness about it, a pepper that doesn't overwhelm, something you can savor and taste but still has a good kick to it.

Other than that, this recipe is just like any other burger, some sharp cheddar, some crispy salty fried bacon, some veggies and some garlic mayo. Simple really. But I'll post a quasi recipe just in case!

Recipe: The Lauren Burger

Ingredients:

Serves 4

1 roasted, peeled, seeded and sliced green chile
1 sliced tomato
1/2 red onion thinly sliced
1 lb. bacon, fried
Sharp Cheddar, enough to smother each burger with
Garlic Mayo (featured elsewhere on the site, just search "garlic mayo", it's all about ratio really)
1 1/2 lbs. all natural ground sirloin
salt and pepper to taste
4 Buns


Directions:

1. Form meat into burger patties, and season well with salt and pepper.

2. Grill on medium heat until desired doneness. Add cheese a few minutes before burgers are ready to come off the grill.

3. Place on bun, and dress up with your toppings.

4. Savor the amazingness that is this burger!

Monday, September 10, 2007

Spice up your Chocolate.

I'm sorry my recipes have been a bit less frequent lately. I've been busy gearing up for school, and work has been unusually difficult the last two weeks. And my time spent not focused on either seems to be pretty taken as well. I don't think I've had a weekend to really just sit and relax for two or three weeks. And this weekend was no exception. I've got about two hours this morning to do whatever it is I want to do, so I thought I should first and foremost post this recipe.

These mini bites of delight pack a quite a punch, and I think the cayenne in the batter really alters the taste of the chocolate. I actually believe the spice of the cayenne takes over any sweetness in the cake. However, this is balanced by a silky smooth, sweet, creamy chocolate buttercream, which, in my opinion leaves you with a nicely balanced flavor combo. The cakes themselves are not so much spicy, as they are warm. They will quietly warm both your tastebuds and your throat, and the frosting will be there to cool things down a bit. It's quite a delight.

I made them for a "garden party" hosted by a friend of ours, alongside a Lemon and Lavender Cupcake (which I wasn't so fond of, and didn't have time to take pictures of, so all the better). I wanted something garden-esque (Lavender) and something chocolate, but different, and mini (because I found a million and one of these amazing little mini cupcake papers at Daison). I also wanted both to look spectacular, and not plain. And of course, like it generally does when I take the time to think of something new, fun and original, it just came to me! First I thought, itty bitty red pepers of somekind, whole, and half dipped in chocolate, but then I realized finding such a petite pepper was going to take time I didn't have. So, low and behold, at my favorite produce place, there were fresh, bright red, twisted cayenne peppers calling my name. I cut them into tiny little slivers and covered them with the leftover bittersweet from my buttercream. They were perfect, and looked really amazing, and fun! I think they were a hit. So I encourage you to try something new and different, you're generally pleasantly surprised!

The cake batter, and frosting I made is actually a Barefoot Contessa recipe that I altered, so instead of copy and pasting I'm going to link to her recipe and tell you how to make the batter my way.

The recipe is located here: http://www.foodnetwork.com/food/recipes/recipe/0,,FOOD_9936_36337,00.html?rsrc=search

I added 1 TBLS. of cayenne pepper and 2 TBLS. high quality cinnamon to the batter.

In hindsight I may add just a touch of cinnamon to the frosting to give it a little more of a "mexican chocolate" flavor. I think the recipe could use a bit of tweaking, but it was definately a good start!

Yum! And oh-so pretty!

Saturday, September 01, 2007

This is Serious.


Ain't no Pussy., originally uploaded by razzieswirl.

A very serious burger. And the perfect way to end a Saturday evening. I don't think I've ever made a burger so perfect, but I rarely cook with beef, so I rarely make burgers. This is actually a recipe from a restaurant in New Mexico, I found it because I was searching for a Green Chile Burger, preferably from New Mexico for Lauren because she just returned from New Mexico (her hometown) with a bunch of green chiles. Unfortunately we didn't spend the evening together, but I still went for it and made these burgers, which are really simple, but slathered with green chile sauce, avocado, provolone, and heirloom tomatoes. They are delicious! I suggest giving them a try, I wanted to make burgers once more before the weather turns truly sour here in the northwest!

Recipe to come.

Lemon Souffle Pancakes & Raspberry Reduction.

What a perfect way to start a Saturday morning. . . Lemon Souffle Pancakes, easy, simple, delicious, fluffly, light, sweet, and warm. I paired these pancakes with a pot of cinnamon coffee (just throw a tablespoon or so of cinnamon in your grounds before brewing), and topped them with a drizzle of raspberry reduction and traditional maple syrup. We also enjoyed a beautiful plate of assorted fruits topped with the same raspberry reduction. I love when I have the time to sit down in the morning and just slowly enjoy Thomas' company, in robes and slippers, over a delicious meal and a great cup of coffee. I wish every morning were more like this morning.

Recipe: Lemon Souffle Pancakes

Ingredients:

1 cup all-purpose flour
1/4 cup sugar
2 tsp baking powder
3 - 4 tsp lemon zest, finely shredded
1/4 tsp salt
1 egg yolk
1/4 cup butter, melted
3/4 cup milk
3 egg whites
1 tsp cream of tartar


Directions:

1. In a medium mixing bowl stir together flour, sugar, baking powder, lemon peel, and salt.
2. In a small mixing bowl beat egg yolk slightly. Stir in melted butter and milk.
3. Add egg yolk mixture all at once to the flour mixture. Stir just until moistened (batter should be lumpy).
4. In another medium mixing bowl, beat egg whites with an electric mixer at medium speed until soft peaks form.
5. Add the cream of tartar and beat on high until stiff peaks form.
6. Gently fold egg whites into flour mixture. Do not over-mix.
7. Pour 1/4 cup batter onto hot, lightly greased griddle or heavy skillet.
8. Cook over medium until pancakes are golden brown. Turn to second side when pancakes have bubbly surfaces and edges are slightly dry. Repeat with remaining batter.

Enjoy!

Sunday, August 26, 2007

Without the Taco.


Fish Taco Salad., originally uploaded by razzieswirl.

This is delicious, light and refreshing. I encourage you to try it before the summer is over. I absolutely adore it when I go into the kitchen, no recipe in hand, and whip something together that's just so co-hesive and delectible. This Fish Taco Salad is just that.

I haven't had too many fish tacos in my day either, so whipping up the dressing was a bit foreign to me, but I was happy and surprised that I had so many appropriate ingredients on hand, ie, lime, clinatro and green onion. I was also happy to see a spicy taco seasoning packet in our cupboard (not ours though, our roommates, handy nonetheless). You don't need the shell when you've got cool red and green cabbage mixed with filling black beans and topped with a crusty fillet of cod that's been baked in a little flax oil. Yum, yum.

I'm going to miss summer, almost soley for the fact that our little outdoor fresh produce grocer closes in october after they sell their last batches of fruit and veggies, along with a large quantity of jack o' lantern pumpkins. Quality, inexpensive produce is nearly impossible to come by in the fall and winter months. I've still got a little while to enjoy the fruits of summers labor. . .

Recipe: Fish Taco Salad.

Indgredients:

1 lb cod
1/2 cup italian bread seasoning
1/4 cup panko breading
few TBL. spicy taco seasoning
1 egg
1/2 green cabbage, shredded
1/2 red cabbage, shredded
1 can black beans, drained and rinsed
1 TBL. flax oil (coldpressed) drizzled into your baking dish
Lime Cilantro Dressing (recipe to follow)

Directions:
Preheat oven to 350 degrees.

1. Place your egg into a shallow bowl and lightly break up with a fork or whisk.
2. Lightly season your fish with salt and pepper.
3. Place you bread crumbs, taco seasoning and panko onto a plate and mix lightly.
4. Dip your fish in egg wash, then roll in crumbs.
5. Prepare your shallow baking dish with flax oil.
6. Place fish into baking dish and bake in oven for 15 minutes or until fish is flaky and cooked through.
7. Place cabbage and beans into a large bowl.
8. Mix Lime Cilantro dressing into cabbage and bean bowl.
9. Top with a chunk fish and enjoy!

Lime Cilantro Dressing:

Ingredients:

1/4 cup light mayo
1/4 cup light sour cream
(you may want to use a little less of each depending on the size of your cabbages)
zest and juice of 1 lime
3 TBL. chopped cilantro
2 small cloves of garlic
3 green onions, chopped

Directions:

1. Mix all ingredients into a bowl. Enjoy on whatever you like.
(it's reallly delicious)

Pièce de résistance.


Pièce de résistance., originally uploaded by razzieswirl.

Alright, well, after much speculation and discussion with close friends and family (most of which who were lucky enough to try this cake) I've decided not to post the recipe. However, if you would like to email me I would probably be happy to share. You see, this cake is so good it just feels like it's one of those recipes I need to keep to myself, in case, someday I do open a little cakery or something like that. I wouldn't want my most prized cake out there for anyone to make for themselves, this said, I don't mind sharing with the few of you that might want to take the time to email me first.

To be honest with you, I'd give this cake a go on your own, with your very own favorite cake and cheesecake recipe. As you can visually see it's pretty darn straight forward. I encourage you to give it a try. All I did was use my favorite chocolate cake recipe (which makes two nine inch rounds) and my favorite cheesecake recipe without the crust (obviously). Then I layered them, chocolate, then cheesecake in the middle, then chocolate again. I smeared a bit of raspberry reduction between the top chocolate cake and cheesecake layer covered the entire thing in a gooey cream cheese frosting and topped all of it with a swirl of reduction which I ran a toothpick through to make a spider web design. The reduction ran down the sides of the extremely enormous cake.

It was such a hit. It fed about 20 people. The chocolate cake is moist, sweet, dark and delicious. The cheesecake smooth, and soft, and the raspberry reduction adds a little kick and gives the cake some extra definition. The flavors and textures in this cake really work well together. It's also a reallly impressive piece. People couldn't stop raving about how beautiful it was, or how delicious it was. I'm oh-so proud of myself. This truly was my pièce de résistance so far.

My grandmother would be proud.

missmallory at gmail dot com.

Saturday, August 25, 2007

Pink Frosting & Sprinkles.


Pink Frosting & Sprinkles., originally uploaded by razzieswirl.

I know I haven't been around much since my birthday, lifes just been kind of busy lately. And although I've been cooking up a storm still I just haven't found as much time to blog about it. Today is Kevin's birthday party and I've decided to make the most intenese cake I could think of, a devils food AND cheesecake cake, covered with cream cheese frosting and drizzled with a raspberry reduction sauce. I will take pictures and post the recipe I promise. I'm hoping it will be a hit! I'm trying to make a Juniors-esque cheesecake/cake combo. Flickr Juniors Devils Food if you don't know what I'm talking about. . .

In the meantime, enjoy the pink frosting and all those colorful little sprinkles.

xoxo

Tuesday, August 07, 2007

Dee-lish.


Rock Shrimp Burgers., originally uploaded by razzieswirl.

I'm going to be frank. It's been about a month since I made these. I used a recipe I found on the food network site. The recipe was for Rock Shrimp Burgers with Wasabi Mayo. Sounds great right? Not so much. I hated them. The roomie and Lauren seemed to like my version and the Wasabi version. I hated the Wasabi burger. I really thought it was disgusting. This coming from a girl who LOVES wasabi, and fish. Maybe it's because the burger itself was missing any kind of asian flare. It was just literally egg, rockshrimp, salt and parsley. Fine, but not when your pairing it with wasabi. The flavor of the burger was more reminiscent of the Northwest (where I preside) and therefore in my opinion, should be paired with something that drew from the same flavor arena.

My solultion? Garlic, lemon mayo. Tomato. And slowly caramelized onion (if you know me, you know caramelized onions and I have a deep rooted love affair). I was very satisfied with my take on these burgers. I could've eaten a million. They're reach, and tasty and such wonderful little delights.

I will post the recipe for the burgers, and the garlic mayo. If you want to try your hand at the wasabi mayo I'll let you seek that out on your own. Just go to www.foodnetwork.com and recipe search Wasabi Rock Shrimp Burgers.

Happy flavor hunting!

Recipe: Garlic Mayo

Ingredients:

1/4 cup mayo
4 garlic cloves (we like it really spicy here, less if you don't)
1/2 tsp. lemon juice
sprinkle of lemon zest

Directions:

1. Mix all 4 ingredients in a little dish. Spread on all sorts of burgers, sandwiches, panninis (you get my drift).

Recipe: Rock Shrimp Burgers

1 pound rock shrimp
1 egg
1/4 cup finely chopped parsley leaves
1/2 cup panko bread crumbs
Kosher salt
Freshly ground black pepper

Hamburger buns, for serving
Tomato slices, or cherry tomato slices, for mini-burgers, for serving

Directions:

1. Heat your grill.
2. Process half the shrimp with the egg.
3. Coarsely chop the remaining shrimp and put it into a bowl.
4. Add the processed shrimp and the parsley, bread crumbs, and salt and pepper to taste.
5. Divide the mixture into 4 portions and form them into patties.
6. Grill them on medium heat until cooked through, about 3 to 4 minutes per side. (You can also fry them in a skillet with a little oil.)

Place on buns with your own fixins, and enjoy!

Another Salad.


, originally uploaded by razzieswirl.

So I've obviously been on a real salad kick lately. There are a few simple reasons for this.

1. It's summer, it's hot, and salads are quick, refreshing and filling.

2. I've been exercising a lot and salads are healthy, and generally contain a lot variety.

Okay so, that's only two reasons. I could come up with more, but I frankly don't want to.

I'm going to make this post short and sweet. I have a lot of other posts to catch up on and since this is a dish I pulled out of thin air (ie what I was craving on the specific night) the recipe will probably be fairly choppy but simple.

Recipe: Southwestern Salad
Serving: 2 to 4.

Ingredients:

1 can black beans drained and rinsed
1 ripe avocado chopped into one inch peices
1 cup sweet cherry tomatoes cut in half
1/2 rotisserie chicken shredded
2 fresh white corns slathered in cilantro butter (recipe to follow) and barbequed
2 TBL cilantro
Sharp cheddar cut into little inch peices (use your own cheese discretion here)
A few TBL Jalepeno Gouda (not required, we had it on hand)

Recipe: Cilantro Butter

1. Put 2 TBL cilantro and 4 TBL butter with 1/2 tsp. cumin in a small dish and mix until well combined.
2. Rub all over your two corn on the cobs. Season with salt.
3. Barbeque on high heat for 2-3 minutes per side, until well charred and flavorful.
4. Cut all corn kernels off the cob.

Directions:

1. Put all of your ingredients into a bowl. Stir. Season with salt, pepper, even hot sauce. And enjoy!

(Sorry, I know the directions are kind of lame, it's easy though, promise).

Easy peasy.
Dee-lish.

Monday, August 06, 2007

Creamy Goodness.


Cracked., originally uploaded by razzieswirl.


I cannot describe my love for really good creme brulee. And luckily, it's really, really simple to make. Anyone can do it, if you can boil water, you can make creme brulee. I'm a true believer of this. Maybe I'm wrong, some may disagree with me. I know we covered a day of custards, including creme brulee, in culinary school. So maybe it's not as easy as boiling water, but close. The ingredient list is short, the steps, are also short. So what's not easy about it? And you'll have enough egg whites left over to whip up a few days worth of egg white omeletes for an easy, healthy morning breakfast (to make up for your very unhealthy indulgence of a dessert).

My suggestion; buy a bottle of champagne, make yourself some creme brulee, pop Amelie into the DVD player and cozy up on the sofa. This, my friends, is my idea of a perfect evening.

This is the perfect creme brulee recipe, it's creamy, smooth, sweet, has the perfect consistency and has the most intense (in a good way) vanilla flavor. You can never go wrong with an Alton Brown recipe.

Recipe: Vanilla Bean Creme Brulee (Courtesy Alton Brown)

Ingredients:

1 quart heavy cream
1 vanilla bean, split and scraped
1 cup vanilla sugar, divided
6 large egg yolks
2 quarts hot water

Directions:

1. Preheat the oven to 325 degrees F.

2. Place the cream, vanilla bean and its pulp into a medium saucepan set over medium-high heat and bring to a boil.

3. Remove from the heat, cover and allow to sit for 15 minutes.
4. Remove the vanilla bean and reserve for another use.

5. In a medium bowl, whisk together 1/2 cup sugar and the egg yolks until well blended and it just starts to lighten in color. Add the cream a little at a time, stirring continually.

6. Pour the liquid into 6 (7 to 8-ounce) ramekins.

7. Place the ramekins into a large cake pan or roasting pan. Pour enough hot water into the pan to come halfway up the sides of the ramekins.

8. Bake just until the creme brulee is set, but still trembling in the center, approximately 40 to 45 minutes.

9. Remove the ramekins from the roasting pan and refrigerate for at least 2 hours and up to 3 days.

10. Remove the creme brulee from the refrigerator for at least 30 minutes prior to browning the sugar on top.

11. Divide the remaining 1/2 cup vanilla sugar equally among the 6 dishes and spread evenly on top.

12. Using a torch, melt the sugar and form a crispy top. Allow the creme brulee to sit for at least 5 minutes before serving.

Most of the vanilla bean will sink to the bottom, so you may end up licking the ramekins clean. I know I do!


Thursday, August 02, 2007

An Autumn Salad. In the Heart of Summer.


Autumn Flavors., originally uploaded by razzieswirl.

I'm going to make this post quick and simple seeing as I already posted a recipe, and hope to post yet another this evening.

I made this salad mid-week after a long day, and a hard workout at the gym. It always lifts my spirits to work out really hard, and end the day by eating something amazingly delicious & healthy. This salad was perfect in achieving that feeling. Not only does it have protein (sharp cheddar, walnuts, and roast chicken) but it's got a huge serving of fruits (pear and apple) and veggies ( mixed wild greens and spinach) all topped with a sweet and tangy reduced apple cider vinagrette. All this, and it was fairly simple to throw together (picking up a roast chicken at the grocery store helped). It's also involved enough (picking the chicken off the bone, slicing the veggies, making the dressing) that I feel like I spent good quality time with the ingredients (cooking really relaxes my spirit). Plus, the cleanup was super easy, making my (finally) clean kitchen stay just that, clean.

Recipe: Autumn Salad

Ingredients:

Salad:
1/4 cup grated SHARP cheddar
1 apple sliced thinly (I used an organic Fuji, because they're generally really crisp)
1 pear sliced thinly
2 cups mixed greens (including spinach)
1/2 roasted chicken, plucked from the bones
4 TBLS roasted walnuts, chopped

Vinagrette:

1 cup apple cider/juice (use the good stuff people)
4 TBLS cider vinegar
2 tsp.
pepper to season

Directions:

Vinagrette:

1. Pour apple cider/juice into pan and reduce down on medium heat whisking occasionally until it's about 1/4 cup of liquid.
2. Remove from heat and add olive oil and cider vinegar.
3. Season with pepper and whisk vigorously.

Assemble:

1. Throw all salad ingredients into a nice bowl.
2. Drizzle with your delicious vinagrette.

And viola. A healthy dinner for two.

As Seen on Tv.


Sweet & Savory., originally uploaded by razzieswirl.

So, a few weeks ago I was having dinner out at my mothers house, we were curled up in her bed eating nachos and watching the Food Network (what else?). Giada was on one of her tasty travels to New York. She sampled these delicate brightly colored watermelon and grape (or cherry, I'm not sure) tomatoes lightly seasoned with olive oil, balsamic, and a touch of s&p skewered. I'd never seen anything quite like it. Considering I've just began to warm up to watermelon, I was on the fence about what I was seeing on tv. My mother on the other hand seemed intrigued, seeing as she likes both ingredients I thought this recipe might really appeal to most people. As Giada put it "they're light and simple". They're also really bright, colorful, beautiful, and impressive looking.

Oddly enough, when Laurens birthday rolled around I had half a HUGE watermelon sitting in the fridge, and nothing to do with it. Seeing as really good organic sweet tomatoes are cheap this time of year, I figured I would go for it and try my hand at recreating what I'd seen on tv.

It was a success. They are light, refreshing, colorful, and simple with a nice flavor complexity. Sweet, savory, tangy, and even a bit bitter. Really good. Even for a girl on the fence about watermelon. An added bonus, they looked really stunning. All lined up like little soldiers on a rectangular white plate, they can't be missed, it looks like something right out of a fancy gourmet magazine. But it's so easy to pull together, and the perfect summer appie. OH, and did I mention, they're really REALLY healthy?! Score. For me this means what I don't eat in appetizer calories, I can make up for by drinking an extra glass (or two) of french wine.

Recipe: Tamelon Skewers (Tomato Melon Skewers)

Ingredients:

1/2 cup cubed watermelon (about one inch cubes)
1/2 cup halved little sweet tomatoes
1 TBLS reduced balsamic
1 TBLS good olive oil
dash of sea salt
dash of pepper

Directions:

1. Place a cube on watermelon on a toothpick.
2. Place a halved tomato (cut side up) on top of your cube of watermelon.
3. Repeat steps 1-2 until all watermelon and tomato are gone.
4. Assemble on a crisp white (or other cool) plate.
5. Drizzle evenly with olive oil and balsamic.
6. Season with s&p.
7. Eat.

I can't go on about these enough. I just loved how cool they looked, and cool they tasted. Ah.May.Zing. Yay for summer, and birthdays!

Monday, July 30, 2007

Joyeux Anniversaire.


Joyeux Anniversaire., originally uploaded by razzieswirl.


Last Wednesday was Laurens 21st Birthday.
We did have a drink with her at midnight at a bar downtown on her birthday, but we didn't get to properly celebrate until Sunday night. We ended up going for a french theme, mainly because I wanted to watch Amelie, drink champagne and eat creme brulee. So we ran with that idea.

Lauren has been celebrating for a good, oh, 6 nights, but did not have a birthday cake! Although I was determined to make creme brulee I knew I had to make a cake too. It's not a birthday without a cake. We planned for two appetizers, two desserts, croque monsieurs and ratatouille.

The party started at 6pm, and I wasn't home from the gorcery store until 3:30pm. Somehow I managed to make a coffee chocolate cake with a mascarpone whipped ceam filling, a homemade buttercream ganache, 6 ramekins of creme brulee, one plate of watermelon/sweet tomato skewers, a bowl full of ratatouille, and six large croque monsieurs (inlcuding the cream sauce), in about 2 1/2 hours. Not to mention halfway through Thomas' dad dropped in. Was it not for my trusty helpers, it would've never gotten pulled together so quickly.

It was lovely, we feasted on good food, managed to drink 3 bottles of lovely french wine, and watched my favorite movie of all time. Thomas had turned the tv room into an Amelie wonderland. Stars hung from a red tulle'd ceiling and candles were strewn about the room everywhere. It was magical.

I will be posting recipes and pictures from the fete here shortly.

Happy Birthday (again) Lauren!


ps.
asher you're on my shit list.
I can't believe you haven't even touched the mess in the kitchen.
seriously?

Tuesday, July 24, 2007

Watermelon Martini


Watermelon Martini, originally uploaded by razzieswirl.


So damn delicious.
So cool and refreshing.

I promise I will post this recipe, and the Absorption Pasta recipe tomorrow. Promise.

Okay.
This Martini is soooo easy to make, all you really need is some ice cold vodka, and some ice cold seedless watermelon. The watermelon does a nice job of soaking the vodka up. This drink is not only delicious, but nice and refreshing too. Much like a Cucumber Martini.

Ingredients:

Makes 2 Martinis

4 shots of good vodka
1/4 of a large watermelon pink flesh scooped out
dash of cranberry juice
a few ice cubes (optional)

Directions:

Place all ingredients into a blender and blend well.
Pour into a martini glass.

You'll get a nice, sweet, airy light pink foam atop your sweet, cool juice.
Perfection!

My Milkshake. . .


Green Tea Milkshake, originally uploaded by razzieswirl.


I love matcha. I stuck my nose deep into the tin this green powder of goodness comes in and took it in. I swear, matcha could be drugs. I love the smell. It makes me feel good inside just to take it in.

I'm going to be quick here, we're heading out to The Beaver for Laurens 21st at midnight. Woot woot.

I'm so tired. . . I'm usually in bed by 11. Ah!

Green tea milkshake:

A few scoops ice cream
2 TBLS matcha
Splash of milk

Directions:

Mix all ingredients in a blender until smooth. Delicious!

Friday, July 20, 2007

Absorption.


Absorption., originally uploaded by razzieswirl.


Let me set the scene for you as I sit here on my little yellow stool, in my now fairly dirty kitchen, typing away. The window to my left is open, and the breeze is blowing in ever so slightly. It's been raining and the air smells sweet. I'm facing my kitchen table, which is glowing due to the 3 massive candle sticks that sit atop little "mercury" holders. Empty plates, strewn about. I sit here listening to Yann Tierssenns compostitions reflecting on quite possibly the best meal in a long time.

The rain affords a certain kind of meal, I think. A hearty, warm, belly filling comfort food. As Lauren put it, it's the kind of meal that warms you from the inside. In her case, not only did this dinner warm her from the inside, but it sent shivers through her, twice.

And while I'd like to give you the particulars now, I am going to wait. I've got a very fancy bottle of chocolate sitting here to my right, and I'm itching to make a spiced hot chocolate with it. After I do that, we are all going to snuggle into the TV room and watch a delightful movie. Check back in the next few days for a better explaination and the recipe. It's worth the wait, I promise.

xoxo

Alright, here's the recipe. I suggest making this dish when the sky is grey and the air is cool. Snuggle up and enjoy.

Serves 4 (with enough left over for one persons lunch, if you're guests don't eat seconds that is)

Ingredients

2 pork chops cubed
One onion diced
4 cloves of garlic, finely sliced
2 TBL balsamic vinegar
1/4 cup white wine
1 jar of good red sauce
1 lb of shell pasta
2 TBL butter and olive oil
salt and pepper

Directions:


1. Heat the olive oil and saute pork browning evenly. Season with S&P.

2. Add butter and the onion. Allow butter to melt and cook for a few minutes.

3. Add the wine. Reduce to a medium heat. When the wine is almost gone, add the balsamic.

4. Reduce heat to the lowest setting. Let it bubble like this for about 15 minutes, until the onions are completely caramelized.
(Add a splash of wine or balsamic if you need to)

5. Add the dried pasta to the mixture and coat pasta evenly in the mixture.

6. Add the pasta sauce and stir. Pour in a mixture of enough wine and water to just cover the pasta. Return to a gentle simmering heat and cover.

7. Cook pasta about 15 to 20 minutes, testing now and again.

8. When the pasta is nearly done, or a little past al dente, remove the lid, and bring up the heat. Most of the liquid should evaporate after a few minutes of brisk, uncovered bubbling leaving a thick sauce and tender pasta. Top with some fresh basil and any good parmesan you have lying about.

And viola!
Quite possibly the best meal I've had in months.

m.

Sunday, July 15, 2007

Baked.


Finished Brioche., originally uploaded by razzieswirl.

I promise, cross my heart, hope to die, that I will post the recipe tomorrow.

A word to the wise: good but not great. I think I was craving a sweet scone like baked good, not this. Oh well. Didn't turn out bad though! Will be delightful in the morning with a cup of tea!


Update:

Alright, like I promised I'm posting the recipe. I've never had brioche but my own, so I couldn't tell you if it turned out right or not. It was fairly tasty, but not sweet, and I think it's supposed to be sweeter than it is. So I was also a little bummed about that.
Here goes:

Brioche:

Ingredients:
1 2/3 cups all-purpose flour - extra for rolling and kneading
2.5 TBLS butter softened
2 eggs at room temperature
1 TBL yeast
2 TBLS sugar or honey (I'd use more of either)
1/3 cup warm milk
1 dash salt
1 egg yolk mixed with 1 TBLS honey to glaze

TO MAKE RASPBERRY ROLLS YOU'LL NEED:

1 cup raspberries (next time I'd sprinkle them with a little sugar)


Directions:
1. In a bowl, mix the flour with the yeast then make a hole in the middle.

2.Add the warm milk mixing with the hook attachement on your mixer.

3. Add the sugar and a dash of salt

4. Add the softened butter, in pieces, waiting until each piece has incorporated until adding the next.

5. Add the eggs, mixing well between each.

4. Work the dough until it is elastic-y and begins to detach from the sides of the bowl (about 10 minutes +)

5. Cover and let rest in a warm place for two hours (I put it in my oven, off of course) until it doubles in size.

6. Work the dough again for 10 min and divide it in three large balls (or into small balls the size of your hand for raspberry rolls).

FOR RASPBERRY ROLLS:

Roll each peice out to about 1/2 inch thickness and about 5 by 5 inches. Sprinkle each piece with fresh whole raspberries and place into greased muffin pan.

or

7.Place them in a greased round mold and cover. Let rise for an hour again (same with raspberry rolls in muffin pan).

8. Preheat the oven at 350 F.

9.Brush the brioche with the egg yolk mixed with honey.

10. Place in oven for 20-30 minutes. Until lightly golden.

11. Remove and let cool on a rack.

They were okay. Not great. I probably won't be making them again.