Tuesday, June 29, 2010

Deep Fried Baby Sweets


I wanted to come up with a playful title for this post but I just couldn't! I don't understand why exactly, I'm sure I could find some inherent quality, characteristic, or flavor in these pickles that would make for a good play on words title, but nope, didn't happen. Maybe it's because this dish is ridiculously straightforward. Come on, it's a sweet gherkin, dipped in flour, egg, panko and finally fried in a hot oily bath. Have you ever heard of such a thing? A deep fried pickle that is. I hadn't. Seeing as such I didn't use a recipe to make these. I winged it.

I needed a fun bite pre-dinner with our cocktails for our anniversary dinner on Sunday, preferably something southern-esque and thus in my mind fried. At first I harkened back to the deep fried macaroni and cheese squares I made only a couple of weeks ago. Then I realized that was an awfully bad idea, I couldn't serve my guests deep fried cheese and pasta. With pulled pork, egg buns, and sweet potato fries I was sure to send someone to the hospital for open heart surgery if I stuffed them full of deep fried mac and cheese before a dinner with all that fatty goodness even got started. Okay, so, let's fry something a bit healthier I thought. Now, I know what you might be thinking brine-y sweet pickles are not the healthiest option, but they're also no mac and cheese. I have to say that they were popular with half the group, and disliked by the other half. I had no expectations really, it was a fun little kitchen experiment before dinner. You'll know whether you're interested in attempting this appetizer, it's one of those dishes that either intrigues you or doesn't. If you're curious here's how I did it: 

Deep Fried Sweet Baby Gherkins 

Ingredients: 

16 gherkins (I actually mixed a few sour cornichon in the batch too)
1/3 cup ap flour, in a small bowl
1 egg, lightly beaten, in a small bowl
1 cup panko, in a small bowl
2 cups vegetable oil in a dutch oven heated to 350 F

Directions: 

1. Roll each pickle in flour, then dip in egg, finally dredge in panko.
2. Place pickles 4 or 5 at at time in the hot oil. Fry for 30 seconds to a minute until lightly golden brown.
3. Place on a paper towel to drain of excess oil.
4. Plate and serve with sweet mustard.  

If you give this a try, I'd love to know what your thoughts are about it since it got such mixed reviews from my nearest and dearest!


Monday, June 28, 2010

8


Sunday June 27th 2010 was the 8th anniversary of togetherness for the boyfriend and I. To celebrate we invited over our close friends for a long southern inspired feast. Pulled pork sandwiches, deep fried pickles, sweet potato fries, coleslaw, pomegranate/lime cocktails, strawberry shortbreads and plenty of champagne was on the menu. We drank, we ate, we laughed, we cooked, we enjoyed, and at the end of the night we found ourselves all gathered around the firepit in the back for dessert. We sure feel blessed with our little life, struggles and all. Thank you to everyone who came over to celebrate with us. It couldn't have been more perfect! (And for you readers out there, get ready for a few recipes from this dinner!) 

Sunday, June 27, 2010

The Daring Get Light : Daring Bakers June 2010


The June 2010 Daring Bakers Challenge was hosted by Dawn of Doable and Delicious. Dawn challenged the daring bakers to make Chocolate Pavlovas and Chocolate Mascarpone Mousse. The challenge recipe is based on a recipe from the book Chocolate Epiphany by Francois Payard. 

As I mentioned earlier this month I've sort of (okay, really) fallen in love with cherries this season. Standing in my kitchen, cutting each one in half, pitting them, feeling the red juice on my fingertips, plus, they're absolutely gorgeous to look at it, no? Deep, dark, almost sinful. To me, they spark many of my senses; taste, visual, tactile. It only seemed natural that cherries would make the perfect accompaniment to this airy, yet rich chocolate pavlova. 


Pavlova's are like clouds. Chocolate, vanilla, doesn't matter. Topped with generous portions of whipped
cream these simple egg white based desserts are like a cloud on your tongue. A show stopper, and a crowd pleaser. They take mere minutes to whip together, and a few hours cooking to dry them out in a very lightly heated oven. Making them (in my opinion) a perfect dinner party dessert. Whip together, then forget about them in the oven for a few hours until you're ready for dessert. I couldn't have been happier with the way my chocolate puffs turned out. To make my variation on this months daring bakers theme simply dip one end of each of your pavlovas after they have baked and cooled in melted semisweet chocolate. After filling with the chocolate mascarpone cream, crown each one with freshly whipped heavy cream sweetened lightly with a bit of honey, sprinkle with split bing cherries (I macerated mine with a bit of vanilla bean sugar), and finish with a few pan toasted almonds (and if you dare, more of that melted chocolate for drizzle). Crunchy, creamy, light, rich, and smooth. Textures and flavors abound, desserts rarely get much easier or more gorgeous! 

Chocolate Pavlova Meringues

Ingredients: 

3 large egg whites
1/2 cup plus 1 Tablespoon of sugar
1/4 cup powdered sugar
1/3 cup cocoa powder

Directions: 

1. Preheat oven to 200 F, placing rack in the center. Line baking sheet with silpat or parchment paper and set aside. 
2. Place egg whites in a medium bowl, and whip on high until medium/soft peaks form. With beater moving slowly (about 1 Tablespoon at a time) add your granulated sugar. 
3. Increase speed to high and beat until stiff peaks form (stiff but not dry).
4. Sift cocoa powder and powdered sugar over stiff egg white mixture, then slowly fold in. It may take a minute or two to come together, but I promise, it will. Just be patient, gently folding chocolate into egg whites. 
5. Instead of filling a pastry bag and piping out my pavlova, I used a standard ice cream scoop to make nice individual sized desserts. My batch made about 8 pavlovas. Scoop of pipe onto prepared baking sheet.
6. Place pavlovas in oven and cook for 2-2/12 hours, until crispy on the outside and chewy on the inside!
7. Remove from oven and top with mascarpone cream (recipe below), whipped cream, and whatever garnish your heart desires!

Chocolate Mascarpone Cream

Ingredients: 

1 1/2 cups heavy cream
zest of 1 lemon
9 oz 72% chocolate
1 2/3 cup mascarpone 
2 Tablespoons grand marnier (optional) 
pinch of nutmeg

Directions: 

1. Heat 1/2 cup heavy cream and the zest of a lemon in a medium sized saucepan until hot (just boiling). 
2. Add chocolate and whisk until smooth and well combined. Set aside. 
3. Place remaining cream, and mascarpone in a bowl with the nutmeg and whip on medium speed until mascarpone has loosened up a bit. Add the grand marnier and whip until the mixture holds soft peaks (being careful not to over beat as the mixture will break). 
4. Mix about 1/4 of the mascarpone mixture into your chocolate mixture to lighten. Fold remaining mascarpone into chocolate. 
5. Dollop or pipe onto the top of each pavlova. 

Viola! Another great month for the Daring Bakers!

Saturday, June 26, 2010

just because


Peony, originally uploaded by miss.mallory.


IMG_9661, originally uploaded by miss.mallory.

Thursday, June 24, 2010

Summer Supper : Roasted Red Pepper Quinoa with Roasted Chicken

Come summer I'm usually a lot lazier in the kitchen, if I'm in the kitchen at all. Summer cooking at our little house consists mostly of long evenings outside, a hot grill, cold drinks, and lounging. And as many of you know, grilling is generally a pretty simple endeavor. Meat and veggies on a stick, rich fishes soaked in simple marinades, bowls of greens and potatoes. So, for those evenings I am actually standing in front of the stove in the kitchen I want it to be just as quick and easy.

In the northwest come summer our farms explode with beautiful local produce, meaning I find myself eating a lot more greens and veggies because they're far better than whats available at the grocery store. My body, and mind wander to dishes that pack a healthier punch. I whole heartedly believe there's something about the warm weather that makes me want to eat greener and healthier, and in turn, something about cold rainy weather that pulls me in the direction of warmer decadent dishes. Now that summer is officially here, our eating has officially shifted. This dish being a decent example of that.

I've had quinoa a few times, but, in truth I've never once cooked it myself, that is until a few nights ago. I looked at a couple of recipes, spoke to a friend of mine who cooks quinoa quite often (I call him a quinoa expert, though he may not necessarily like the title). Then scoured my pantry and fridge, and kind of just pulled this dish together. That's what I love about quinoa, this grain is like a vessel for anything you may want to throw in it. It's the kitchen sink of grains. It's so incredibly good for your body too. It packs a wallop of protein and fiber, plus it's low in calories and fat. It's nutty in flavor, but mild enough that it doesn't overpower your other ingredients. I toasted it in a dry skillet before cooking it down in the vegetable broth, a step I highly recommend, doing so gave it a nutty flavor that can't be touched by other grains like brown rice. Once it was cooked down and fluffy I tossed it with a simple, tangy lemon dressing, flat leaf parsley, and bits of chopped roasted red pepper, topping each plated portion with a simple salt and pepper roasted chicken. The end result was bright and satisfying. If you're going to be in the kitchen at all this summer, I couldn't think of a quicker more fulfilling meal.

Roasted Red Pepper Quinoa

Ingredients:

1 1/2 cups quinoa - toasted (dry) in a skillet
2 cups vegetable broth
1 1/2 roasted red peppers (I roasted my own, but you can easily use jarred)
2 Tablespoons fresh lemon juice
1 Tablespoon olive oil
2 Tablespoons roughly chopped flat leaf parsley
s&p to taste
Roasted Chicken to 'garnish'

Directions:

1. In a medium pot bring vegetable broth to a boil. (great time to toast your quinoa)
2. Add toasted quinoa, stir, cover, and allow to cook down for about 17-20 minutes
3. Meanwhile dice your roasted red pepper, and, combine lemon juice, olive oil, and flat leaf parsley in a small glass, whisk lightly, season with salt and pepper.
4. When you're quinoa has finished cooking, remove from heat, then pour dressing over hot quinoa, tossing to coat. Next, add chopped pepper.
5. Plate with a wedge of lemon, and a generous portion of roasted chicken.
6. Now find a sunny spot, and enjoy your simple, healthy dinner!


Wednesday, June 16, 2010

Basics : Vanilla, I mean, Coconut Cupcakes


toasted coconut cupcakes, originally uploaded by miss.mallory.


My dear friend Rachelle makes the worlds best coconut cake. It's absolutely out of this world incredible, so much so it's the one thing I wished for (and received) last year on my 24th birthday. In fact, I'd say it's the only thing I remember about my birthday last year, besides this cake, it just wasn't that memorable!

I adore this cake. Wait, I shouldn't make that statement yet because I swear there's something different between this cake and the cake I ate for my birthday last year. To me, they just don't seem to be the same cake. Let me explain. About a week ago I promised my Psych teacher that I would bring something sweet for our last class of the quarter as she was contemplating buying pizza or cookies. I felt that the group of students I've been in class with, who have worked hard for the last three months, deserved a special sweet treat. Our class has been a long three hour stretch late in the evening every Wednesday. That's a hefty length of time to spend cooped up in a classroom, let alone as the days got longer and spring began to bloom and blossom all around us. This was also one of those classes where your in different groups every week, discussing, and I'd been going on to a slew of my peers about how much I loved to bake and cook. So, I figured it was about time to show my chops. I quickly settled on cupcakes, a treat I used to bake up on a weekly basis but have since lost my passion for. Don't get me wrong, I still eat cupcakes (of course) I just don't bake them like I used to. Thinking cake my brain got stuck on coconut, so I turned to Rachelle for guidance. Rachelle turned me over to this recipe.


toasted coconut cupcakes, originally uploaded by miss.mallory.
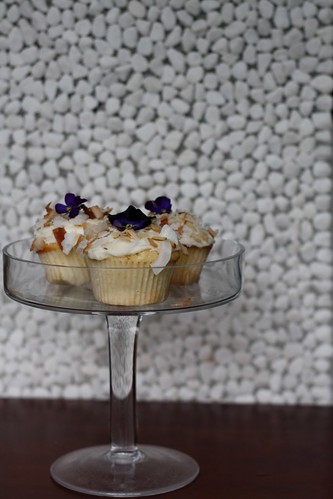
Let me start by saying that this is a great recipe. However, for me, it was pretty far from coconut. Kind of crazy considering it has a whole can of coconut cream. Maybe it's the cupcake form? I don't see how that could be exactly. . . but it was what it was. A very good vanilla cake. Moist, light, and delicate. Even the cream cheese frosting, laden with even more coconut cream which I had high hopes would lend a kick of coconut flavor, didn't really deliver. The only element that really did was the crust of toasted shaved coconut (and toasted almonds) I coated the top of each cake with. They may have been one of the best vanilla cupcakes I've baked, but they sure didn't scream coconut to me.


toasted coconut cupcakes, originally uploaded by miss.mallory.
Now, I'm hoping you don't feel that I've lured you here under false pretenses, something along the lines of 'Come read about my delicious coconut cupcakes, but muah-ha-ha, they're in fact vanilla!' You see, I had to share because they still turned out wonderfully, and were devoured quickly and happily with one student going as far to profess to me 'this is the best cupcake I've ever had in my entire life!'. Maybe you can pump up the coconut volume a bit? Maybe you don't want to and will simply enjoy the moist richness the coconut cream adds to the cake. Either way, they're simply scrumptious. I'm not the least bit disappointed in my choice, and, in my book these cupcakes are worth your time in the kitchen.

Recipe : Coconut Layer Cake from the Shubox Cafe, NJ
(adapted to make 2 dozen regular sized cupcakes)

Cake:

2 3/4 cups ap flour
1 teaspoon baking powder
1/2 teaspoon baking soda
1/2 teaspoon salt
1 3/4 cups sugar
1 cup (2 sticks) butter, room temp
1 cup sweetened coconut cream (I used Coco Lepez as the recipe suggests)
4 large eggs separated, room temp also
1 teaspoon vanilla extract
1 cup buttermilk

Directions:

1. Preheat oven to 350 F. Line a 12 cup muffin pan with cupcake liners.

2. Whisk dry ingredients, flour through salt, in a medium size bowl. Set aside.

3. In the bowl of an electric mixer on medium speed, or with a hand mixer, cream butter, sugar, and coconut cream until light and fluffy (appx. 3 minutes)

4. Add the egg yolks, and the vanilla extract and mix to combine.

5. On very low speed add 1/3 of your dry ingredients to batter until just incorporated, then 1/2 of your buttermilk until incorporated. Continue this (1/3 flour, 1/2 buttermilk) until both are gone, starting and ending in flour. This whole process should take no more than a minute and half, be sure not to over work the flour/batter or you will have hockey pucks and not light airy cake!

6. Set batter aside. In another medium sized bowl (I wiped my flour bowl clean) whip your egg whites with a pinch of cream of tartar until stiff but not dry. Fold whites into cake batter.

7. Using a standard ice cream scoop, fill liners 2/3 full (about one full scoop). Bake in oven 20 minutes until just lightly golden and puffed. Remove and cool.

Frosting:

8 oz. cream cheese, room temp
1 stick butter, room temp
1 1/2 cups powdered sugar
(recipe suggests 2 cups, I don't like my frosting that sweet, I want to taste the cream cheese!)
1/2 cup canned sweetened coconut cream

garnish: toasted shaved coconut, almond shavings

Directions:

1. In the bowl of an electric mixer on medium speed, or with hand mixer, beat the cream cheese. Add the butter and incorporate well.
2. Add sugar, and cream, beating until fluffy and smooth.
3. Assemble cupcakes, generously spread frosting over each cupcake top, roll in toasted coconut, garnish with fresh flowers or berries.


Decimated Coconut Cupcake, originally uploaded by miss.mallory.

Tuesday, June 15, 2010

Blushing Dark Cherry Cocktail


Cherry Cocktail, originally uploaded by miss.mallory.
I have an affinity for cocktails. Not exactly sure why. Perhaps it's the movies I grew up idolizing, the oldies straight out of the 40's, 50's, and 60's when a cocktail meant more than going down to the corner college bar and drinking yourself into oblivion. In the movies the folks imbibing were always glamourous, chic, and alluring. Enjoying a drink was something to be savored and enjoyed. For me it's always seemed a thing of art and beauty. Something special, and lovely, a good way to end a day or start an evening with friends. There's just something so special, and classic in a cocktail. I apologize, I feel as though I'm gushing. But honestly, I get just as excited tracking down the perfect cocktail for a party as I do about planning a menu or my decor. One of my favorite Friday or Saturday night activities is inviting a friend over for a chat, a cocktail (I need to start counting how many times I've typed cocktail. . .) and a bite, which is precisely how this charming cocktail (. . .7) came about.

Cherries aren't at their peak quite yet. But week after week those plastic baggies with luscious deep red cherries have started making an appearance at the grocery store. They finally got to me. I couldn't resist any longer. I knew if I picked the perfectly ripe juicy fruits out of the bunch, pitted them, and allowed them to macerate in a bit of sugar they'd be absolutely perfect for a cocktail. That they were. Sweet dark cherries topped with vodka, sparkling berry water, and a kiss of cherry juice. This is an ideal, light, slightly sweet drink, perfect for a lazy long evening. The large bits of cherry waiting at the bottom of your glass are just a bonus, a sweet little gift at the end of great drink.

Blushing Dark Cherry Cocktail

Serves 4
(I served mine in tall narrow glasses, you may want to adjust vodka/sparkling water ratios depending on the type of cocktail glass you chose to use)

1 1/2 cup fresh cherries, pitted and macerated in sugar
4 oz vodka
8 oz sparkling water (I used a berry flavored to give it a kick of extra flavor)
crushed ice

Directions:

1. Divide 4 tablespoons of cherries into four glasses (add an extra Tablespoon of the sweet cherry juices from the bottom of your cherry bowl or jar also). Then fill glass with crushed ice, pour 1 oz. of vodka into each over ice, top with sparkling water.

Now it's time to savor your cocktail, and your company.


Cherry Cocktail, originally uploaded by miss.mallory.

Sunday, June 13, 2010

Snapshot Sunday : Cherry


Cherry Cascade, originally uploaded by miss.mallory.


Cherry, originally uploaded by miss.mallory.


Friday, June 11, 2010

Get Gluttonous : Deep Fried Mac & Cheese


Deep Fried Mac & Cheese, originally uploaded by miss.mallory.

Alright. I admit it. These photographs I'm about to share with you aren't super stellar. Hopefully, I'll be changing them out come Sunday morning with better ones as this was merely the test run for an appetizer Rachelle and I are preparing for tonights cooking club dinner themed 'the seven deadly sins'. So, making round two this evening means more pictures. I had to share this with you regardless of how I feel about the pictures. Absolutely had to. Deep fried mac and cheese might not be anything new, but damn is it delicious. Incredibly decadent and downright sinful. Oozing cheese laden noodles surrounded by a blanket of crunchy fried panko. Oh my. Dip these hot golden gems in whatever you like, our favorite was the sriracha laden ketchup, a little sweet with a little spice. Runner up was a spicy barbecue sauce. Tomorrow we have plans to make a jalapeno cheese dip, cheese on cheese, could it get anymore gluttonous than that?

What's even better, it's much simpler than you might imagine it to be. Some of the blogs, and other recipes out there suggested box mac and cheese was a big no-no. I thought it sounded like a good idea, I saw it as more cheese, powdered cheese. I prepared two boxes of Annie's Mac and Cheese with plenty of butter, milk, and the cheese powder. On the side I made a rich bechamel with with two tablespoons butter, 2 cloves of garlic, a pinch of fresh thyme, two tablespoons flour, and two cups of milk. To that I added sharp cheddar, velveeta (per Saveurs suggestion), and a bit of well aged Dubliner. I think the trick is to make your mac and cheese far too creamy. So creamy you wouldn't want to eat it out of the pot or in a bowl. The refrigeration process seems to suck quite a bit of the cheesey moisture out of your m&c, so the creamier the better. I also think that the more gooey it is, the more it's going to stick together once it's chilled and while you're frying. So, I added about 3/4 of my bechamel to the already prepared m&c, until it was basically drowning in cheese sauce. Reserving the other 1/4 for thinning and adding a bit more cheese and jalapeno to for dipping. Spread your extra creamy m&c in the bottom of a prepared 8x8 glass baking dish. I had about 1/2 cup left over that wouldn't fit in the pan, so I used a melon baller and made little mac and cheese rounds (what's pictured above and below), so you could do them all round if you wanted to, or all square, it's up to you.

Once the cheese has spent a good 4+ hours in the refrigerator, it's time to fry. Pour a few inches of oil into a dutch oven and heat over a medium flame to about 350 F. While it's heating create your dredging station. Flour first, then a beaten egg, finally a healthy portion of panko. Cut your m&c in squares, or peel your balls off of the wax paper (ok, that didn't come out right) and you're ready to go. Dredge in flour, dip in egg, roll in panko. Drop into hot oil. These babies will only take a minute (or less) to cook. The result? A hot, cheesey, gooey, crunchy ball of fat goodness. Your thighs may not thank you, but your tastebuds (and guests) will.

A special thank you to Rachelle for taking over the frying duties. I hate all that hot oil popping! I couldn't have done it without you!

Sunday, June 06, 2010

Snapshot Sunday : Backyard Cotton Candy


IMG_8314, originally uploaded by miss.mallory.


IMG_8463, originally uploaded by miss.mallory.


IMG_8529, originally uploaded by miss.mallory.


IMG_8591, originally uploaded by miss.mallory.


IMG_8548, originally uploaded by miss.mallory.


IMG_8549, originally uploaded by miss.mallory.


IMG_8626, originally uploaded by miss.mallory.