Sunday, November 28, 2010

Daring Bakers : November 2010 : Crostata


This November the daring bakers were challenged to make a Crostata. Crostata is essentially an italian tart, most often made with pastry cream and fruit filling. A sweet short pastry crust is baked, topped with delectable fillings, cut, and hungrily consumed. 

I was a little late on this challenge as time has become somewhat of a precious commodity these days. School, work, and the impending holiday season has me in a bit of a whirlwind. So, I'm going to be quick and tell you simply, make this. I adore tarts, almost as much as I adore cookies and cake. Simple, gorgeous, and downright delectable. I couldn't have asked for a more perfect challenge!


The 2010 November Daring Bakers’ challenge was hosted by Simona of briciole. She chose to challenge Daring Bakers’ to make pasta frolla for a crostata. She used her own experience as a source, as well as information from Pellegrino Artusi’s Science in the Kitchen and the Art of Eating Well.

For some reason when I try to post the recipe, blogger is just not reading it. Fortunately, there are thousands of Daring Bakers out there who I'm sure did not have the same issues with posting as me. Be sure to check them out!

Thursday, November 25, 2010

Gobble It Up : Candied Pecans & Dried Cranberries


An uber quick post as the boyfriend and I are frantically packing overnight bags, and gingerly placing stuffing, creme brulee, roasted squash, and my homemade green bean casserole in to-go bags. We've only got about half an hour before we're headed out to my mothers, boyfriends sister & food in tow for a long, lazy, thanksgiving night. Hard to believe some of you are already sitting down to eat! 

We're not your typical family when it comes to Thanksgiving. We usually eat dinner around 7 or 8. You see, we feel that any holiday, or mid week day off, should be taken full advantage of. That's why we take the afternoon to sit in front of the fire, play gin rummy, sip wine (glass, after glass of wine), maybe taking a few minutes to flip through a magazine or two. Eventually, we boot ourselves up and take all five dogs (theirs and ours) out for a long romp through the massive 20 acres of greenspace situated just beyond the 5 acres my mother owns. Then we come back inside, and repeat the sitting in front of the fire ritual quite a while longer. That's where a treat like these simple and delicious candied pecans come in oh-so handy. Regardless of the fact we're about to eat a massive meal, we still need something to nosh & nibble on while we lounge around.


This recipe was introduced to me by my dear friend Reaux. A true kitchen wizard. I'm posting them on Thanksgiving because they're that simple. A three (okay, maybe four or five if you count the seasonings) ingredient recipe that boasts a list of things you probably already have in your pantry. It all cooks up in under a half an hour in the oven, and viola! Insta-amazing-snack. Absolutely delicious with a glass of wine, and a warm fireplace. The nuts dry out a bit, making them extra crunchy and crisp, while the sugar coating dresses each nut with the flavor and texture of toffee. I like to toss mine with a handful of dried cranberries and/or cherries (making the mix look quite festive). So, if you don't already have enough on your plate, or your table, consider this delicious little snack. Absolute perfection for a relaxing afternoon such as this one.

Reaux's Candied Pecans
(enough for 6-8 to snack on)

Ingredients:
2 cups pecans 
(I'm sure you could use any nut really, pistachios would be delish)
4 Tablespoons dark corn syrup
4 Tablespoons granulated sugar
healthy pinch of sea salt
healthy pinch of cayenne
1/4 cup dried cherries/cranberries to toss

Directions: 

Preheat the oven to 325 F and place parchment paper or silicon baking mat on rimmed baking sheet

1. In a small to medium bowl, cover pecans with water and swish around. Drain well, place nuts on a paper towel to dry.
2. In a small to medium bowl add your nuts, then toss well with corn syrup and sugar. Season with salt and cayenne.
3. Pour mixture, in one even layer, on prepared baking sheet and place in the oven. 
4. Bake for 25-30 minutes, stirring occasionally (to keep the nuts coated in sugar mixture)
5. Remove from oven and allow to cool.
6. Break apart stuck together bits with your hands, put in a bowl and toss with dried fruit.

Viola, a simple, tasty little treat!


(can I just say: after a week of snow and ice, we woke up this morning to yet another snow storm! what in the world is going on here in the northwest? so unlike our little corner of the world! truly magical nonetheless)


Monday, November 22, 2010

Snapshot Sunday : Brooklyn Foodie


Oh Brooklyn, Brooklyn. 

Sunday, November 14, 2010

Snapshot Sunday : The Little Red Lighthouse & the Great Gray Bridge


If you know me personally, you likely know I have a thing for lighthouses. I fell in love with this charming little red lighthouse, built long before the George Washington Bridge was erected, and now towers over it. There is something quite special about it, no? 

Thursday, November 11, 2010

A Twist on a Classic : Cranberry Lime Bars


 I've had quite the productive morning, let me tell you. I got up with my darling boyfriend and the sun, early enough that I was convinced I'd be crawling back in bed and sleeping in once the boyfriend was off to work, but no. For reasons unbeknownst to me, I made a shopping list, headed to grocery store, purchased a basket full of goodies only to come home and start dinner. Dinner prepared at 8 am! As I sit here and type the air is filling with the delicious aroma of spicy cuban style beef slow roasting in my crockpot (I truly cannot wait for dinner tonight, I may have to have a taste before it's finished).

The busy bee bug just kept on biting. I decided we needed something sweet, and tart, to balance what will surely be a spicy dinner. I also wanted to make something easy, that you my reader, may be inclined to whip up for the impending Thanksgiving holiday.


I threw a cup of of fresh cranberries on the stovetop to reduce, covering them with a few tablespoons of water and sugar and set out to make a simple shortbread pastry crust. My dessert inspiration was an autumn infused lemon bar. Cranberry and lime was a natural choice. The end result was very good. The cranberry and lime compliment each other very well. Tart and sour. The sugary crisp crust, and the gooey topping. It all works so nicely. Next time, I might add a little sweetened shredded coconut to the crust, I just think it would really take this yummy little bar over the edge.

A great little bite with a strong cup of black tea, or coffee.

I enjoyed mine while taking a dreaded chemistry test, which I aced, perhaps thanks to these tart sugary little treats.

Cranberry Lime Bars

Ingredients:

Crust: 
1 stick of butter
1/4 cup sugar
1 teaspoon vanilla
1 cup of flour
 healthy pinch or two of salt

Topping: 
1/4 cup sugar
2 Tablespoons of flour
2 eggs
1/2 cup cranberry preserve 
(I simply reduced cranberries, sugar and water on the stovetop until I had my own fresh 'preserve')
1 teaspoon lime zest
1/3 cup fresh lime juice


Directions

1. To make the crust; melt the butter, mix melted butter with sugar, vanilla, flour and salt until it comes together. Press into the bottom of a prepared 8x8 baking dish and bake on 350 F for 20 minutes until cooked and slightly browned.
2. To make the topping; place sugar and flour in a small bowl and mix well. Next, with a small whisk, mix in the eggs, then the preserves, zest and lime juice until well incorporated.
3. Pour filling over warm crust, reduce oven to 300 F and bake for an additional 20 minutes.
4. Remove from oven and allow to cool completely before cutting into squares. I chose not to, but feel free to sprinkle with powdered sugar.


Tuesday, November 09, 2010

A Sip of Autumn : Pear Martinis


I've had the loveliest of evenings. The darling boyfriend and I have spent it lounging in the kitchen, a kitchen I've begun to autumize (and de-halloween). We've been listening to Dean Martin blaring out of the speakers, playing gin rummy, noshing on rosemary crackers schmeared with port soaked sharp cheddar & sipping on these lovely pear martinis. A cocktail truly infused with the taste of autumn. It's as if the season hopped in glass, just for you to ingest and enjoy. A little sour, a bit sweet, with a serious punch of pear. Pear vodka is violently jiggled in a shaker filled with ice topped with pure pear juice, and a splash of lemonade. So simple. So good. 

So why not shake up a batch of tasty cocktails and create a lovely evening at home for yourself, or a few friends? Break out a tasty snack, a deck of cards (perhaps a board game or two), put on a few of your favorite songs and settle in.

Cheers!

Pear Martinis 

makes two

Ingredients: 

plenty of ice
4 oz. pear vodka (I prefer absolut, it's very pear and a little floral)
2 oz pure pear juice
1 1/2 oz. lemonade (or a mix of lemon juice and sugar)

Directions:

1. Fill cocktail shaker half way with ice. 
2. Pour vodka, pear juice, and lemonade over ice.
3. Shake vigorously.
4. Pour into martini or fancy glass of your choice (a nice touch: rim with sanding sugar)
5. Garnish with large slices of fresh pear.
6. Enjoy a warm evening inside.


Thursday, November 04, 2010

Balanced : Sweet & Salty Pancetta Caramel Corn


I'm not a big fan of popcorn. I used to love the stuff, it was the perfect snack to munch while cuddled up on the sofa watching a movie. And now, well, we're not so fond of each other. Not entirely sure why exactly, I suppose my taste buds simply fell out of like. Thinking of popcorn and writing this post has me reminiscing about all of the things I used to hate and now enjoy so much, like: caramelized onions, squash, beets, goat cheese, and sweet potatoes. In fact, until I sat down to write this post I hadn't realized that tastebuds could go both ways. Sure I've heard of tastebuds maturing, growing to love the tastes of foods once loathed. But can it go the opposite way, can you eventually dislike the taste of something you once enjoyed? Case in point, popcorn.

You know, I suppose I don't so much dislike the flavor, I feel that popcorn tastes ok, I just don't like the hassle. The stabbing kernels, those bits of 'popcorn skin' that scrape against your gums and get stuck in between your teeth, that at times, no amount of flossing can rid you of. Now, that I can live without. 

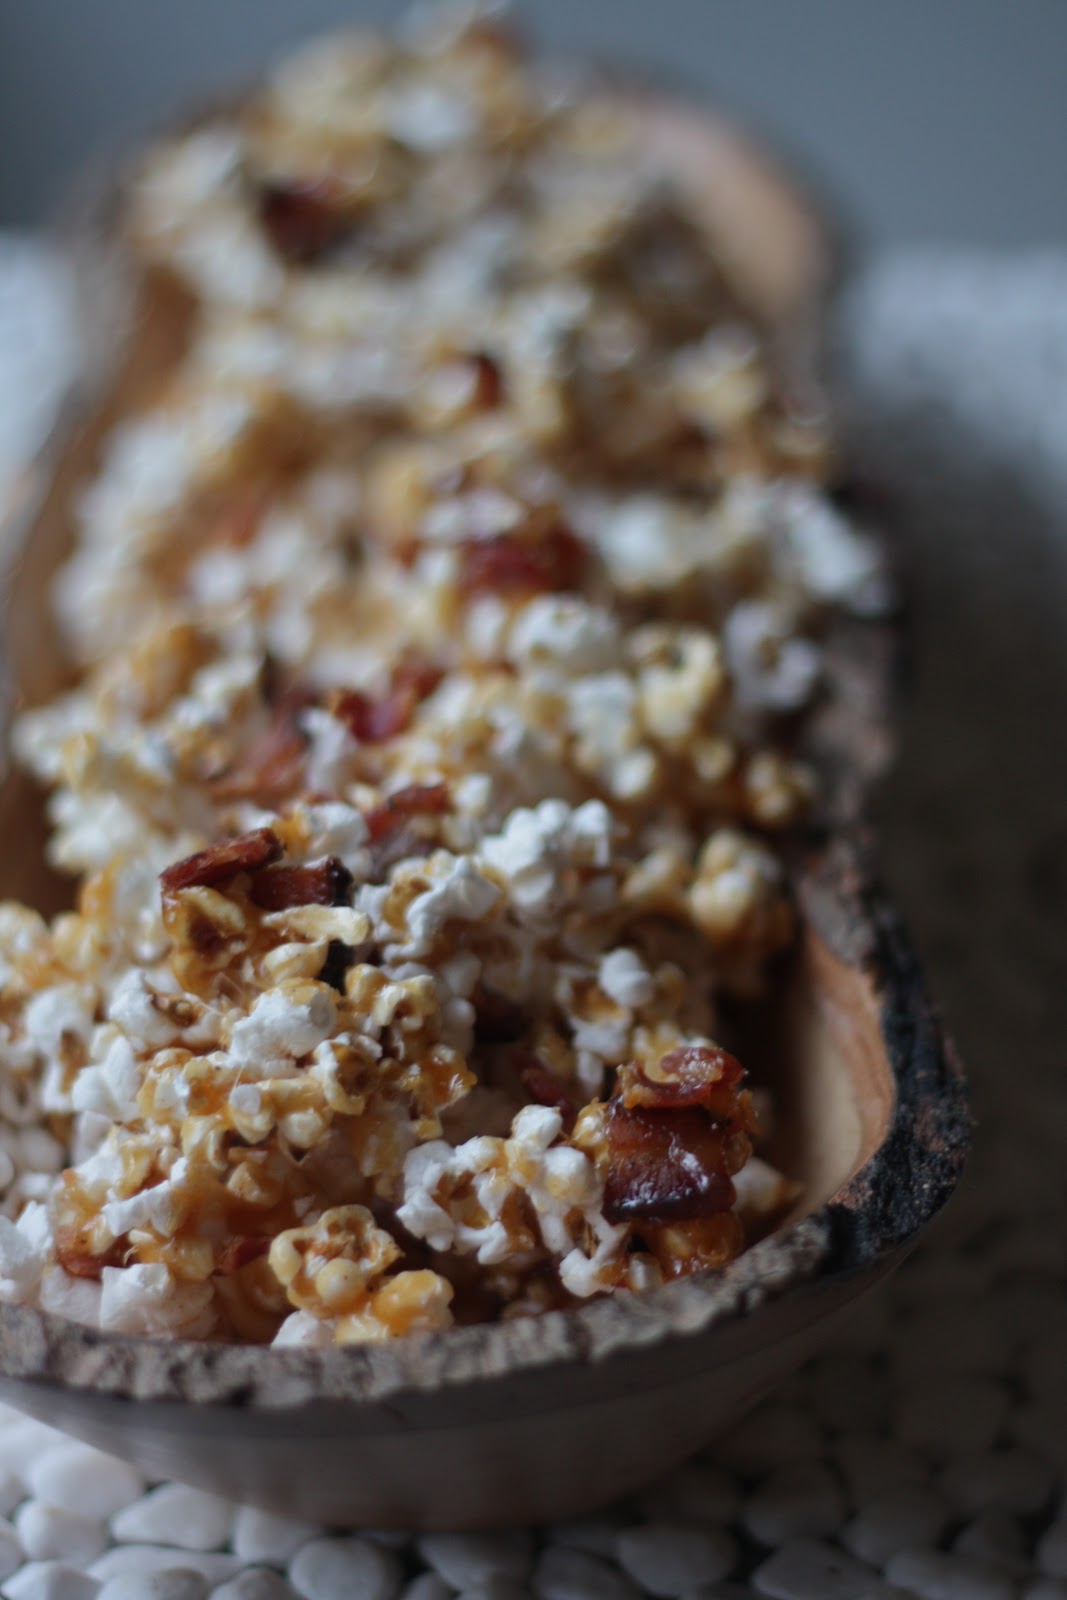
Here I sit delving into my personal aversion with popcorn. Kind of stupid of me actually. I hope I'm not talking you out of popcorn altogether, because I'm about to turn around and tell you to eat popcorn. I'm also about to explain how amazing this popcorn recipe is (remember, this coming from a general popcorn hater). So don't jump on mallory's popcorn bandwagon of hate, give this recipe a try a first. Whether you love the stuff, or turn your nose up at it, this spicy, sweet, pancetta studded recipe will either only deepen your love for this generally popular snack, or make you born again popcorn lover.


No microwaves required. Simply white corn kernels, popped in a few tablespoons of bacon fat (come on, it's already got bacon in it, what's the harm in using a little bacon fat for popping?), tossed with pancetta, sprinkled with cayenne mixed with sea salt, and finished with a healthy dose of black tea caramel. Ladies and gentlemen, despite my disinterest in popcorn, the sweet and salty snack doesn't really get much better than this. I suggest pairing this amazing snack with a good cocktail or tall glass of beer, this would make the ultimate bar snack.

Pancetta Caramel Corn

Ingredients: 

3/4 cup white corn kernels
2 Tablespoons bacon fat
8 ounces pancetta - fried until crispy
1 1/2 cup sugar
1/4 cup water
2 Tablespoons dark corn syrup
1/2 teaspoon sea salt
1/4 teaspoon cayenne
1/4 cup heavy cream
1 Tablespoon black tea
nonstick spray

Directions: 

1. Heat 2 Tablespoons of bacon fat on medium high in tall lidded pot. Toss kernels in the pot, and cover with lid. Wait until the kernels start popping, when they do, hold the pot with holders and shake lightly over flame until popping stops. Pour popped corn into bowl. 
2. Toss fried pancetta and, salt, and cayenne with hot popcorn. Place popcorn on large cookie sheet prepped with nonstick spray.
3. Place cream and loose black tea in a small saucepan, heat until simmering, remove from heat and allow to steep ten minutes. Strain loose leaf out. (you could easily use a strong black tea bag here if you'd prefer)
4. Place sugar, water and corn syrup in medium saucepan, heat over medium heat, stir until sugar dissolves. Stop stirring, and continue to let it bubble for at least 10-15 minutes, until candy thermometer registers at 300 degrees and the sugar is a nice amber color (being careful not to overcook or burn).
5. Remove sugar from heat, and immediately pour black tea cream into sugar (mixture will bubble, be careful) and stir until blended.
6. Immediately pour caramel over corn mixture on cookie sheet, and toss with nonstick spatula (or spatulas, whatever your tossing style may be) until popcorn is well coated with caramel.