Sunday, May 24, 2009

Sun Tea & Salad


Sun Tea, originally uploaded by miss.mallory.


It's officially a gorgeous day here in Bellingham. The sun is hot, the sky is blue, there is a slight breeze and the birds are chirping in full force. The Ski to Sea festival is bustling a mere four blocks down the road. I can tell it's a busy year because the neighborhoods are filling up with vehicles. I just finished a massive cleaning spree, mostly out on the back deck. I busied myself sweeping, getting wood piled up neatly, setting out a lovely outdoor cloth on the table, pulling a few weeds, wiping down the grill. . . you know the drill. Tonight we shall drink beer (in my case ice cold Lillet), barbecue, and host our virgin fire of the year. I'm actually quite giddy about a relaxing evening in the back yard. I deserve it after the stress over the last few days. Happily, a very dear friend will be joining us, he is quite seriously a pro at grilling chicken. I will be making Bobby Flay's paprika and roasted red bell pepper potato salad, which I have been itching to try out for weeks (but more on that later this week).

What better way to enhance a lovely Sunday such as this, than with an exquisite salad and tall, ice packed glass of freshly brewed sun tea. I'm sure most of you are acquainted if not very friendly with sun tea during the summer months. I actually didn't realize until recently that some people make their iced tea in the their kitchen, with tea bags, hot and tap water. Iced tea has always started out for me with a gaggle of black tea bags in a giant jug resting out in the sun. I swear, the sunshine imparts some magical depth of flavor to the tea soaked water, something that all other ice teas lack. But I suppose this could just be my imagination.


Cabbage Chicken Salad, originally uploaded by miss.mallory.


This salad is quite simple really. The greens are a mix of arugula and green cabbage. But the little chicken gems that sit on top are something special (and were a bit of fluke). I started out wanting to make baked almond coated chicken that I could pop onto a bowl of greens and drizzle with Cardini's sesame dressing (one of my favorite dressings of all time, just the right mix of vinegar and sweet). What I ended up with was a much more flavorful and exciting chicken. A few strips I ate just like one would at a bar, like chicken fingers with a little dressing dip (now that I think about it, 'chicken fingers' is kind of a gross moniker). The remainder rested on the lettuce and were drenched with that incredible salad dressing. So, what's so special about the coating on these little (all natural organic, of course) chicken tenders? A mixture of flour, coconut, cayenne, sesame, and almond. The coconut with the spice and the almond is just so, oh-so, incredibly delicious! Sweet, spicy, and nutty. This is quite possibly the perfect lunch for a day like today. So get out there, eat well and enjoy this amazing May weather! Happy Memorial Weekend everyone, I hope that you are all enjoying yourselves (and your barbecues) immensely!

Recipe: Almond Coconut Chicken Tenders
Preheat oven to 375 F

Ingredients:

1 lb. (appx. 12) organic, all natural, chicken tenders rinsed
1 cup of flour
1 Tablespoon cayenne
salt and pepper to season
2 Tablespoons toasted sesame seeds
1/4 cup shaved sweetened coconut (you could easily used unsweetened as well, I just grabbed what was in the cupboard)
1/4 cup shaved almonds
2 eggs

Directions:

1. Mix flour, cayenne, s&p, sesame seeds, coconut, and almonds together in a mediums sized (preferably shallow) bowl.
2. Beat eggs in a small bowl
3. Prepare baking sheet
4. Dip chicken in egg wash then flour, egg again and finally flour (four dips total, yep ladies and gents you're double dippin')
5. Place tenders on prepared baking sheet
6. Bake in oven for appx. 15 minutes then flip the tenders (you want a golden brown crust on both sides, flipping will help to ensure this) and bake another 15 minutes.
7. Cool, and enjoy! Serve however your heart desires! Just be aware, they're kind of addicting. . . . yum!

Friday, May 22, 2009

Ode to Avocado


Honey Mango Avocado Salsa, originally uploaded by miss.mallory.


Ode to Avocado

Oh, little avocado. So delicious and so shiny.
Sometimes when I crave you my voice gets quite whiny.
Your skin is such a lovely shade of green.
Your flesh is sweet, savory, and oh so clean.

Smooshed in a sandwich you are quite delicious.
Mashed in a bowl you are quite auspicious.
All the while remaining incredibly nutritious.

Oh little avocado, how I love you so.
Much more than a little fruit like you could ever know.

How about that? A poem, for an avocado. That should be one honored food, it's not often that I break out in poetic prose, period. For a girl who has only ever taken a seventh grade poetry class, which was, oh, about twelve years ago, that wasn't half bad, am I right?

If you haven't gathered as much, I love avocados. Very plainly, and with a fervor. I could eat them every day. They remain one of the most versatile and healthy foods available in your local produce section. They're good in just about any genre of food. Slathered onto bread, grilled and stuffed with shrimp or chicken salad, spears stuffed in sushi rolls, sliced thinly over leafy greens, blended with milk and sugar, and of course laden in the almighty guacamole. If you wanted, you could add this creamy green fruit to just about anything to greatly enhance color and flavor. It wasn't until recently I met a woman who had never tried and was very unsure of avocados. Needless to to say, I was shocked. It's always been a staple in my household, even growing up. When we'd head to the beach for the weekend, or out to a party, people were always requesting my mothers famous, veggie laden, guacamole. Sometimes she and I would eat a giant bowl of guacamole with white corn tortilla chips for dinner. So, I had never met someone who hadn't eaten an avocado. I guess I just thought it was one of those things everyone consumed and enjoyed. I'm not sure that she actually liked the avocado I served her. She was skeptical by what she believed to be an odd green color, and a mushy texture. It was actually an eye opener for me, maybe even refreshing to hear her thoughts on this little green fruit. I had always considered avocado to be the most beautiful color (hell, it's the color of my kitchen) and would never have described it's flesh as mushy, smooth and creamy surely, but not unappetizingly mushy. It really made me realize that everyone truly does see the world through different eyes, and that's a very good thing, even when we don't see eye to eye.

Last week I was hit with a grumbling craving for avocado. So, off to the store I headed. While there, this little box of honey mangos seemed to be vying for my attention. So, there the avocado and the mango sat side by side in my green basket when it hit me like some cartoon piano from overhead. . . avocado mango salsa. Sitting on my sun drenched deck, drinking a splash of lillet over ice, while snacking on avocado/mango salsa sounded like a perfect evening to me. To complete my salsa I grabbed a bushel of sweet grape tomatoes, a serrano chile, one lime, and a big shallot. Later on in the evening, partly at the insisting of the boyfriend, I roasted a red pepper and threw that, some cheese, and black beans between two small wheat tortillas. After cooking the dillas on a hot grill, we smothered the tops with a generous scoop of my avocado/mango salsa. Now, that was perfection.


Honey Mango Avocado Salsa, originally uploaded by miss.mallory.


MissMallory's Honey Mango Avocado Salsa

Ingredients:

1 large ripe avocado (a little trick, if you don't know it yet, to checking if a soft avocado is ripe or rotten, pull off the little 'seed' on the top, if the flesh is bright green you're good. if it's brown at all, set it down and walk away) diced
1 small ripe honey mango, skin removed, diced
1/3 cup of grape tomatoes washed and roughly chopped
1 shallot finely chopped
1 small green serano chile finely diced (do not touch your face after doing this until you wash your hands, because ow)
juice of 1/2 lime
salt and pepper to season
(this recipe would be super yum with some fresh cilantro too, keep that in mind)

Directions:

1. Mix all ingredients in a bowl. Season with s&p to taste. Viola!

That was most likely the least number of directions I've ever written. This guacamole is super simple, it's all in the prep (chopping veggies, squeezing juice etc.) So, find a nice sunny corner, grab a bag of chips and maybe a cold beer, and enjoy!


Honey Mango Avocado Salsa, originally uploaded by miss.mallory.

Thursday, May 21, 2009

Hello Salmon.

I am incredibly lucky that I live in the Northwest. An endless number of reasons could easily justify this statement, but one that falls to the forefront is the easy access to incredible seafood. We live very close to Alaska, often our stores are packed full of fresh seafood (King Crab being one of my personal favorites). Various genus of salmon swim our coastal waters every year. I am able to head out to the beach and clam dig, mussel hunt, fish, and go crabbing. I can head down to the wharf and buy a whole, caught that day, sockeye from a man on a little blue boat, and barbecue it up that night. It's this reason, and this nearly alone, that makes me hesitant to move too far from my birthplace. I don't think I could survive away from the coast. Maybe it's the Norwegian blood pumping through my veins. I can't imagine life too far from the ocean and the easy access to some of the most amazing food on Earth that comes along with it.

Just like this dinner, the post will remain sweet and simple. Earlier this week I made my first salmon of the season. I seasoned the skin and meat with salt and pepper and threw it on a hot grill. I let the skin get nice and crispy, then flipped it for the few remaining minutes. Couldn't be any easier than that right? I oven roasted asparagus with olive oil, garlic and some finely chopped shallot for about 30 minutes on 375 F (a few fresh herbs or a squeeze of lemon would be really yummy on this as well). To the mashed potatoes I added just a bit of flat leaf parsley and one clove of garlic. When it was all prepared I towered it up, snapped a few photos, and devoured it in minutes. So simple, so delicious, and incredibly 'northwest'.

I loved this dinner so much I reworked it for breakfast the next morning. I simply mixed the leftover salmon and potato together to make a pattie, fried this in a bit of butter, then plated the cake with some reheated asparagus and a poached egg. Sheer breakfast ambrosia.


Monday, May 18, 2009

Let's Review : Dry Soda


Dry Soda : Rhubarb, originally uploaded by miss.mallory.

I've been a Dry Soda drinker since I discovered it's simple, gorgeous little bottles sitting in the cold case at 'the market' on Seattle's northend. I don't get to enjoy Dry Soda as much as I'd like, however, because apparently I live in a town where it is hard, if not impossible to find. Thanks Bellingham.

Recently, on a trip to Edison (likely my favorite town here in the northwest), while browsing the shelves at Slough Food, I found a whole section dedicated to Dry Soda. Immediately I grabbed a flavor I hadn't tried yet, Vanilla Bean. Swoon. Then, like a shot through the heart, my mother tugs at my sleeve and points out this ruby-ish colored bottle. It takes my mind a minute to register. . . . Rhubarb. No way. Rhubarb?! I think I may have squealed with excitement (and Slough Food is a small space to squeal in). If you're a regular reader you may remember it was only recently that I stumbled upon my full blown obsession with rhubarb. So this discovery was beyond too good to be true. I couldn't wait to try what Dry's Rhubarb soda would taste like. I purchased only one to begin with. I opened it immediately and headed to this old wooden bench that sits outside of the Edison Eye art gallery and anticipated my first sip. Heaven. Truly. Heaven. Almost like gnawing on a fresh stalk of rhubarb, sans the bitterness. Needless to say, after enjoying the entire contents of the bottle, I promptly got up, went back to slough food and picked up a four pack to take home.

The one thing I feel I need to stress to you is that Dry Sodas are not very sweet. This is a major coo. It doesn't leave that sticky film in your mouth. After you've chuged one down you don't feel cranky or depressed due to the high fructose corn syrup (that dominates traditional soda and pops) floating around in your system. It's almost, not quite, but almost like sparkling water. The flavors are more interesting, and have more depth than any sparkling water I've had, but each one is just as refreshing as sparkling water. One thing remains clear, it's not about the sugar, it's all about the ingredient. This is a soda any food lover would be proud, and excited, to drink. It's true and honest to the ingredient. You want rhubarb, you get rhubarb. Not sugary sweet rhubarb compote, but just real rhubarb flavor. Same with the vanilla bean, lavender, kumquat, or lemongrass. It's all about the true taste, not the filler. I must also mention I am not a soda consumer, I have never been. Not even growing up. Products like Pepsi and Mountain Dew are not my thing, in fact I despise them. I don't like the way they taste or make my brain and body feel. Dry Soda rises above all of that, it's beyond soda, it's something, well, something quite a bit different. It should have it's own word. What that is, I'm not entirely sure. . .

Part of the reason I wanted to share my review/opinion with you about this company is because they are local and I am all about supporting amazing local businesses. They offer consumers a unique, quality, and incredible tasting product that isn't laden with sugar and filler. Plus, it's super fun to pair their drinks with different dishes, fruits, and veggies. In fact, just yesterday I enjoyed Phad Thai Jay with one of my rhubarb sodas, and although the combo might sound odd, it was incredibly delicious. Trophy Cupcakes sells Dry to pair with your favorite flavor of cake. Dry Soda is truly a wonderful product that deserves props (yes, I just said props). Check out their website for more information including history, company mission and how/where to buy at drysoda.com

While these sodas remain stunningly delicious on their own, I mixed my vanilla bean (and one of my rhubarbs) with freshly sliced strawberries and a glass full of ice, which equaled one happy mouth and body. These are truly drinks you can have fun with!


Dry Soda, originally uploaded by miss.mallory.


* I was not sponsored or paid to write this, or, any of my (few) reviews. Seriously, no company in their right mind would want me blabbering on like this about their product for compensation, am I right?! This is just my honest humble opinion.

Wednesday, May 13, 2009

Make Mine a Mini


Mini Key Lime Cheesecake, originally uploaded by miss.mallory.


It has taken me far too long to write this post. I don't really have a great reason, but I do have a few pretty good ones. One, I had a hellish take home exam in American Lit. this week. The thing is, my teacher does not grade any of our previous work, and the test is based on our previous work, so I really have no idea what I should be improving on, thus, generally resulting in a not so stellar grade in both areas. For a girl with an overall GPA of 3.85, this doesn't sit well. Working really hard hours upon hours on something only to have it fail (twice) doesn't feel good. Any baker would know what I'm talking about here. Take that slab of puff pastry you've been working on for days that doesn't puff perfectly in the oven, or the bread dough that just doesn't want to rise. It happens to us all, this I know. Sometimes, that just doesn't necessarily make it any easier to swallow.

Onto number two, amidst my seemingly busy schedule (which is basically a balancing act between school, odd jobs, and other various life distractions) I managed to meet up with a dear old friend yesterday. Maybe I can't say 'old' yet. I'm in my early twenties, perhaps I should wait another 10 years before I can deem a friendship 'old'. And now that I write this, the word old seems rather unfitting, it's connotation is almost negative in nature. . . . so let me rephrase. I saw a very dear friend yesterday. A girl I've known for, oh lord no, can it be? About 12 years. Okay, that's half of my life, so perhaps if I still wanted to deem the friendship 'old' I could. It's not stale old, at all. I don't think either of us see or speak to each other often enough nowadays. But from the first moment we met we were instantly close. For many years inseparably so. My dear friend was recently in a horrific car accident. While she looks as healthy and as beautiful as ever, you can see that she's still healing when she walks. She does however have one of the swankiest canes a girl could ask for, that sparkly thing is going to make more than a few retirees jealous, I'm sure of it! She's been in town for a couple of weeks recuperating, so it's absolute stupidity that we didn't connect sooner. There is something so oddly comforting about friends you've had for a long time (not old). Even if you don't see each other, or talk as much as you should, there's this feeling of complete affinity. It's like family really. No matter how much time passes, there's a sense of love, comfort and warmth. Something until the last couple of years was likely impossible for me to experience. I believe that one will always have a different connection to the people they grew up with than the friends they make later in life. So, the two of us had a lovely long chat over a couple of black tea lattes and a few sweet treats. Really made me wish we had the opportunity to do it more often. But, c'est la vie, right?

Onto my not so good reason, which might be apparent due to the novella I've written above, I've been putting this post off. Don't ask me why, because I don't really know. I've mostly been enjoying looking at the pictures, who needs words anyway? I joke. Without words there would be no recipe am I correct? So, what are these delicious mini's? Well, as I'm sure you've guessed already, they're cheesecake. But, they aren't your typical cheesecake, oh no, these are key lime cheesecakes that sit atop a crispy crust of graham cracker and coconut. Each little one is topped with a dollop of fresh whipped cream and a sprinkle of lightly toasted coconut. These would be an incredible addition to a summer dinner or backyard barbecue. They're easy to make in advance and keep in the fridge, but they're so fresh, cool and scrumptious. The lime is very prominent (and increases in intensity the longer it sits), some might even call it domineering, but that's what I was going for. Nobody wants to eat a sissy key lime pie, why would they want their key lime cheesecakes to be any different? If you don't have a mini cheesecake pan/mold you could make this recipe in an 8 inch spring-form pan. However, I'm a firm believer that everything is better when you make it a mini (well, almost everything).


Mini Key Lime Cheesecake, originally uploaded by miss.mallory.


Recipe: Mini Key Lime Cheesecakes
Makes appx. 48

Ingredients:

2 cups of ground graham cracker
1/2 cup of shredded coconut
1/2 stick of butter (you may need a little more depending on how blended your crumbs are, you want the mixture to come together enough to press firmly into the bottom of the pan, so add 1 TBS more at a a time if crust mixture doesn't look 'wet' enough)
3 TBS sugar
2 (8 oz.) packages of cream cheese (room temperature)
1 cup sugar
1/8 cup cornstarch
10 key limes (they're much smaller than standard limes) zested and juiced
2 large eggs
1/4 heavy whipping cream


Directions: Preheat oven to 350 degrees F

1. For the crust: Combine graham cracker crumbs, butter, coconut and 3 TBS sugar into a mixing bowl. Mixture should be moist enough to hold together when pressed into the bottom of your pan.
2. Place one of your packages of cream cheese, 1/3 cup of sugar, and the cornstarch in the bowl of an electric mixer fitted with the paddle attachment and beat on medium-low for 2-4 minutes, until mixture is creamy.
3. Add remaining cream cheese, sugar and increase speed to medium-high.
4. Add zest and lime juice and mix thoroughly
5. Blend the eggs, one at a time, allowing each egg to incorporate before adding the next (about 30 seconds).
5. Add the cream until just blended and stop the mixer.
6. Pour batter over crust prepared pans (whether they be mini or spring-form pan)
7. Place in preheated oven and bake : Mini's take 25 minutes to 1/2 hour. Until almost set (the middle should still be a bit soft). Regular size: One hour.
8. Remove from oven and place on counter for another 45 minutes.
9. Cover and refrigerate (preferably overnight, but at least four hours)
10. Top with whipped cream and coconut and devour!


Mini Key Lime Cheesecake, originally uploaded by miss.mallory.

Thursday, May 07, 2009

Cupcake Love : "Icing on the Cake"

I just had to share some cupcake love with you while I sit here snacking on the above while watching The Office.

I recently wrote a review of Bellingham's first cupcake shop, "Katies Cupcakes". However, Katie's are not the only cupcakes in town. "Icing on the Cake" sells a variety of cupcakes down at the Saturday market, which, in my picky opinion far surpass the taste and creativity of Katie's here in Fairhaven. And guess what? You don't have to be in Bellingham on a Saturday in order to make it down to the market to get your cupcake fix. That's right. "Icing on the Cake" might not have a store front, but they are sold here in town everyday of the week. So, where might you procure a cupcake worthy of your hard earned money? Head to Woods Coffee down at Boulevard Park. Not only can you watch the sun set while a group of little sailboats float across the bay, you can do so with a delicious cupcake and a cold iced tea in hand. What's more perfect than that? A seaside cupcake shop. Not much if you ask me.

Trust me. I am the cupcake critic.

Katie's has yet to impress me. I have a feeling that they're popular because people think it's the only place in town they can grab a cupcake. Just wanted to let you know, that's not true! The mini's you see in these pictures are as delectable as they look. Yum!


Tuesday, May 05, 2009

Just in Time


I don't think this post could come at a better time. For those of you scouring food blogs and the internet for a few amazing recipes for mothers day, you'd be crazy not to choose at least one from this laundry list of brunch delectables.

The members in our cooking club have been itching to do brunch, I believe since one of our first dinners. We agreed to hold off until Spring not only so we could enjoy it on a (fingers-crossed) blossom sweet and sunny morning, but also so that as cooks we could relish in the seasons incredible new bounty of fresh produce. We were blessed with a picture perfect May morning, lots of sunshine, a slight breeze, the smell of flowers and fresh cut grass lingering in the air, and the best ingredients and dishes a die-hard 'foodie' could dream of. In the background soft french music played as five excited girls prepared in the kitchen and sat around the dining table drinking one too many tall glasses of citrus laden champagne. It was utter perfection.


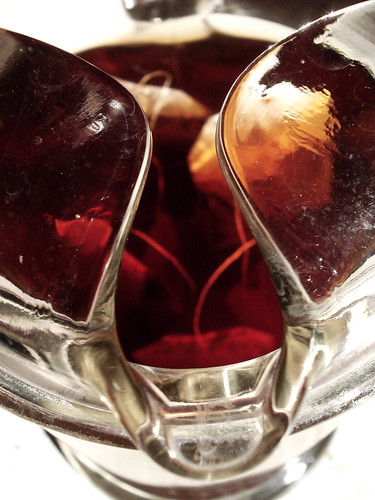
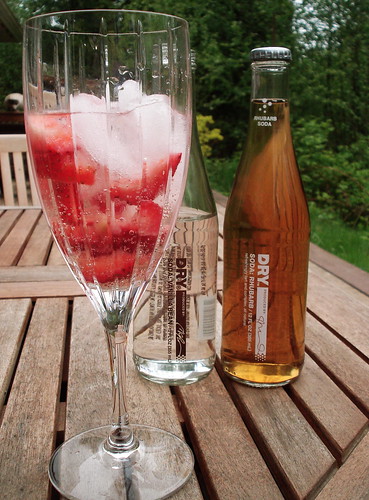
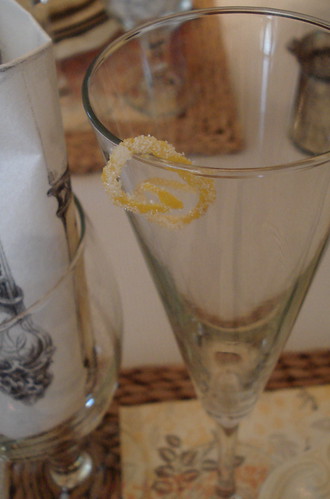
We started the meal with a tall, cool glass of champagne. Our newest member Laurel (who was incredibly lovely) went all out. When one sets out to pair champagne with fresh squeezed juice the natural option seems to be orange or grapefruit. Laurel took it a step further. She squeezed one dozen lemons, two minneolas and one grapefruit, all by hand. She made a simple syrup to only lightly sweeten the citrus juice. . . but I knew she was a keeper when out of from this little tupperware she pulled a variety of curled candied zests. Using our brunch as an excuse she sought out and purchased the tool that makes the perfect zest curls, boiled them in simple syrup, rolled them in sugar, and baked them. All to dress up the champagne glasses and for our enjoyment. . . she took something that can be fairly plain, and made it extraordinary. All five of us enjoyed quite a few glasses which lulled us into into a sweet champagne coma as we eagerly awaited the meal to come.


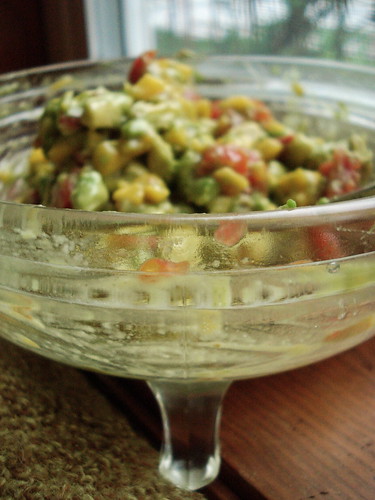
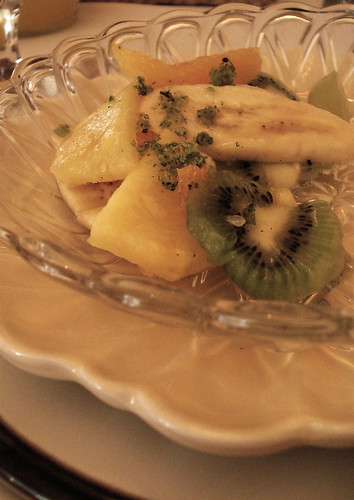
Rachelle started the brunch off with a super fresh fruit salad. When I arrived in her apartment, which is on the top floor of a gorgeous early 1900's brick building, there she was, in the kitchen delicately slicing a wide variety of fruits. Not only was this salad chocked full of pineapple, orange sections, kiwi, bananas, starfruit and grapes. . . she layered it in a trifle dish so that it looked like a fruity rainbow of green, yellow and orange. Just like Laurels champagne Rachelle didn't stop with a traditional fruit salad. Alongside it she served ramekins of lime sugar (that she had ground with a mortar and pestle and baked in the oven to crisp the mixture) and vanilla bean simple syrup. It was an unexpected toppings bar that added both interesting flavor and an incredible crunchy texture to the salad. For Rachelle's recipe, head on over to Use the Good China , where she'll give you the full lowdown on brunch as well as her dishes.


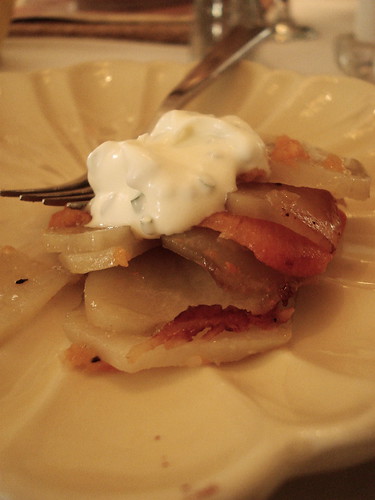
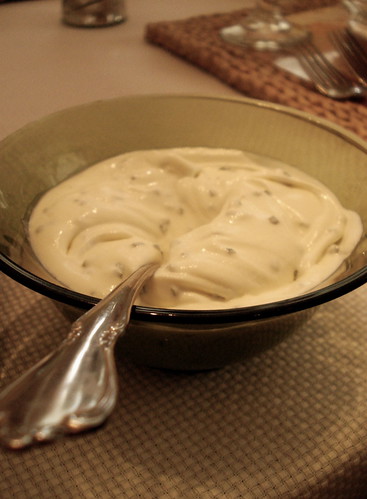
After salad it was time for les pommes de terre, or the potatoes. Laura had toted along a giant turquoise Creuset iron frying pan, filled to the brim with Potatoes Anna, a dish I'd never actually heard of, with her. The little pan waited patiently in Rachelles warm oven, filling the apartment with a rich buttery smell while we all made last minute preparations to our meal. The dish seems quite simple really, it's essentially baby red potatoes and sweet potatoes layered with leeks and plenty of butter. Laura chose not to use cow butter, instead she opted for goat, which really took the dish to a whole new level. The goat butter imparted the slightest musky flavor that goats milk seems to have (in my opinion), something until recently I wasn't very fond of. I don't think this dish would've been as good without the goat butter, truly, it almost added a mystery to the dish. An unexpected tastebud surprise. Alongside the potatoes she served a heaping bowl of creme fraiche speckled with fresh chive. The whole dish just 'worked', it seemed so effortless and delicate yet complex in flavor. It was such a treat! While I didn't get Laura's recipe, I have found one at epicurious that you might want to check out, it's a bit different, but the technique is the same (keep the goat butter in mind, as well as throwing in some caramelized leeks, seriously).


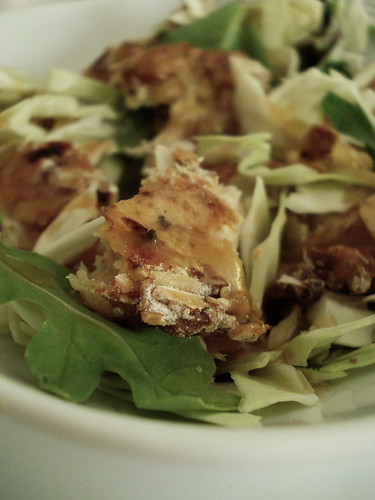
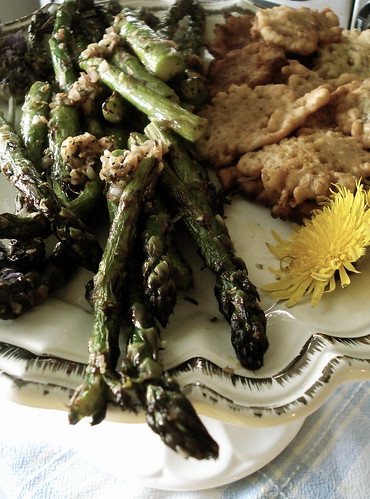
Onto the award for, hands down, the most creative, colorful and palate popping dish. Oven roasted asparagus with fresh garlic and thyme. . . and (drumroll please) deep fried dandelion blossoms! I don't even know that I have the words to properly describe the latter to you. If you're looking for a recipe that's simple, cheap, and is going to surprise your guests, this is it. I have a veritable organic dandelion farm currently growing in the backyard (thanks to a broken lawn mower), and I'm guessing you likely won't have a hard time tracking down a bucket full of dandelion blossoms this Spring yourself. To make this dish, you simply need to pick fully bloomed yellow dandelion blossoms, clean them thoroughly, dip them in your favorite fry batter, and then into a deep pan of hot oil. Viola! The result, a sweet, gorgeous little golden brown blossom, as easy to pop into your mouth as a french fry (but I must say, much cooler)! Alexis served her incredible dish on a cake plate dressed with fresh lavender and dandelion blossoms. I'm still shaking my head in wonderment over this dish as I sit here and write. . . amazing!


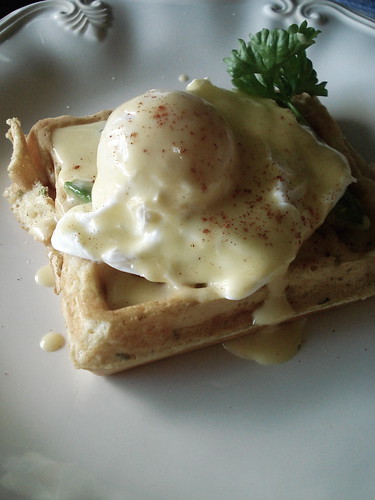
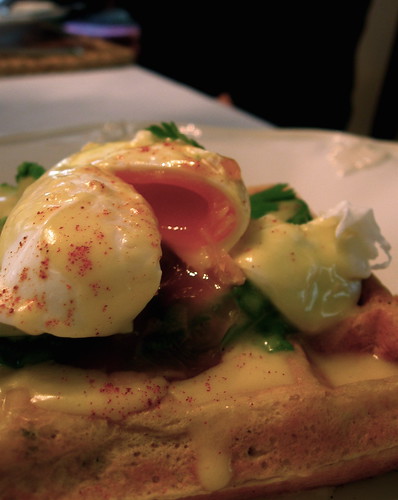
We started the brunch around 11 o' clock and by the time 1 something rolled around we were ready for my dish. I had spent a great deal of my morning whisking little pads of cold butter into warm egg yolk and lemon. I wanted the hollandaise sauce to be silky perfection. All of the other components I held off on until we were ready for the eggs benedict. The savory waffle should be made right before consumption, they're best eaten piping hot. Partially because the batter is speckled with pecorino or parmesan cheese and it's best to get bits of that sharp cheese while it's still warm in your mouth. I was lucky enough to stumble across a carton full of farm fresh eggs, which were gorgeous shades of brown, cream and green. The thing about poaching fresh eggs is that the whites don't 'run', they are very solid and sit in place perfectly while they poach. I like to tuck a healthy scoop of fresh avocado, lightly salted, between the egg and the waffle. After generously pouring the fresh hollandaise over the the tower of waffle, avocado and egg, I usually serve it with a sprinkle of fresh king crab. Unfortunately, I couldn't find any good crab (I'm really picky about my seafood, I won't purchase anything unless it's the best). I make this dish for my mom every mothers day morning and serve it alongside brown sugar/cayenne bacon and slow roasted baby red potatoes. You simply can't go wrong with eggs benedict, and served on top of (an easy) savory waffle with homemade hollandaise? It doesn't get much better than that when it comes to breakfast if you ask me.

Recipe: Savory Waffle

Ingredients:
1-3/4 cup flour
1/4 cup finely grated cheese (parmesan, pecirino etc.)
3 scallions finely chopped
2 Tbs. fresh rosemary, minced
1-3/4 tsp. baking powder
1 tsp. baking soda
1- 1/3 cup whole milk
2 eggs
3 Tbs. melted butter
2 tsp. Dijon mustard

Directions:
1. Mix dry ingredients in a large bowl.
2. In a smaller bowl lightly blend milk, eggs, butter and mustard.
3. Add the blended liquid to the dry ingredients and whisk until incorporated
4. Pour into a preheated belgian waffle iron and allow to cook until golden brown 3-5 minutes

Note: If you have leftover waffles sandwich a thick slice of gruyere and ham on top of or between two and broil for an incredible ham and cheese 'sandwich'

Recipe: Hollandaise (Courtesy of Alton Brown)

Ingredients:

3 egg yolks
1 teapsoon water
1/4 teaspoon sugar
12 tablespoons (1 1/2 sticks) unsalted butter, chilled and cut into small pieces
1/2 teaspoon kosher salt
2 teaspoons freshly squeezed lemon juice
1/8 teaspoon cayenne pepper

Directions:

1. Pour 1-inch of water into a large saucepan; over medium heat, bring to a simmer. Once simmering, reduce the heat to low.
2. Place egg yolks and 1 teaspoon water in a medium mixing bowl and whisk until mixture lightens in color, approximately 1 to 2 minutes.
3. Add the sugar and whisk for another 30 seconds.
4. Place the mixture over the simmering water and whisk constantly for 3 to 5 minutes, or until there is a clear line that is drawn in the mixture when you pull your whisk through, or the mixture coats the back of a spoon.
5. Remove the bowl from over the pan and gradually add the butter, 1 piece at a time, and whisk until all of the butter is incorporated.
6. Place the bowl back over the simmering water occasionally so that it will be warm enough the melt the butter.
7. Add the salt, lemon juice, and cayenne pepper. Serve immediately or hold in a thermos to keep warm.

Note: I used twice the lemon juice and sweet hungarian paprika instead of cayenne.

Recipe: Perfectly Poached Eggs

6 eggs
deep large skillet with lid
water
1 Tablespoon vinegar (white, cider, red wine etc.)

Directions:

1. Crack eggs and place in heat proof cups or small ramekins
2. Fill skillet with ONLY three inches of water (in depth).
3. Bring water to a boil
4. When water is at a rolling boil add vinegar
5. One at a time, quickly add the eggs, a few inches apart
6. Place lid on the skillet, turn off the heat, and allow to sit covered for three minutes (for easy-medium yolk as pictured)
7. Remove from water with slotted spoon, place on sheet with paper towels to drain excess water, serve while hot.


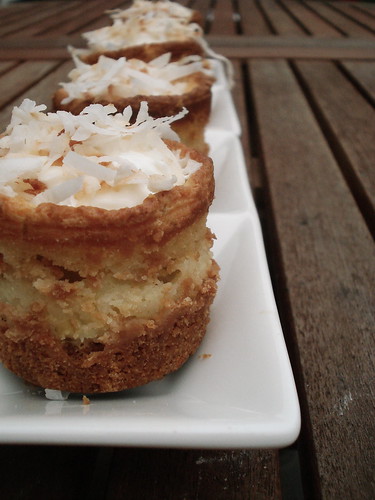
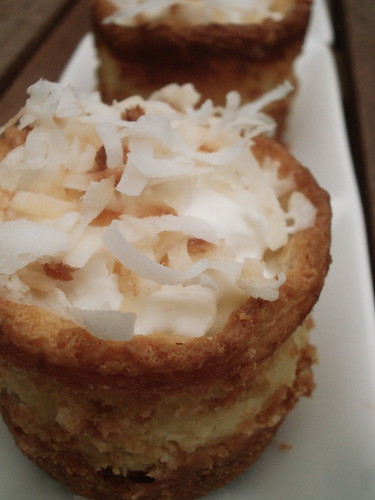
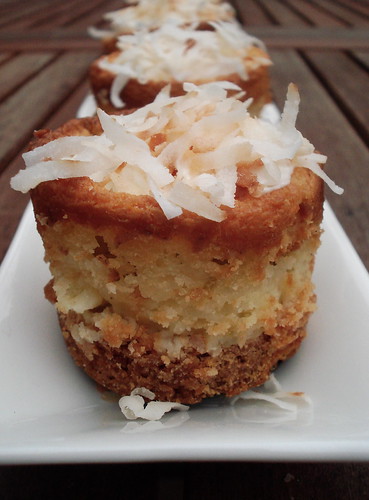
To end our incredible meal Rachelle made strawberry filled scones, which were so delicious I've been craving one everyday since Sunday. The recipe for these scones are from Olive Juice Co. and feature both regular flour and cake flour, as well as a healthy serving of half and half, and a lot of fruit (although, each of us agreed more strawberries would've been even better, I would've wanted at least one strawberry bit in every bite) and that's just the dough. Each scone was drizzled with a milky sugar glaze, that as you can probably see just by looking at the picture, was incredibly heavenly. Since the girls had enjoyed so much champagne Rachelle served the scones with a giant pot of strong black tea laden with rose petals. It was the perfect ending to a mind-blowing brunch. I don't think you could go to any restaurant and get such a creative, spring inspired, delicious meal. Thanks ladies, you are each truly culinary gems and I so enjoyed our brunch together!

Recipe: Strawberry Filled Scones From Olive Juice & Co.

makes 24

Scones:

4 cups flour

4 cups cake flour

1 cup sugar

2 1/2 Tablespoons baking powder

1 teaspoon baking soda

1 teaspoon salt

1 lb. cold butter
Choice of fruits:

2-4 cups blueberries + zest of 2 lemons (4 C. = fruit doubled...)

2-4 cups blackberries + zest of 2 lemons ( " " )

2-4 cups chopped strawberries + zest of 2 oranges ( " " )
1/2 - 1 quart half & half (depending how juicy the fruits are that you're using)

Directions:
In a bowl, combine the flours, sugar, baking powder, baking soda, and salt. Cut the butter into small pieces and then cut into the flour mixture with a pastry cutter. Add the fruits. Stir in enough half & half to just make a moist dough. It should be moistened, but not sticky. With an ice cream scoop, scoop out dough 2" (or shape dough into four even disks and cut each disk into six yielding 24 scones) apart on parchment lined baking pans. Bake in 375 degree oven for 20-25 minutes, or until golden brown. Top with glaze.

Glaze:

3 cups powdered sugar

1/4 cup milk or half & half

a bit of vanilla & almond extract