testing testing one two three.
I apologize, this update has taken me quite some time to finish. But there's reason for it. Like always. Life's been a little too fast paced as of late. Although I've had a break from school for the last three weeks I've spent a lot of time either being sick (which always seems to happen after every quarter), catching up with friends, or celebrating birthdays. In fact, my mother and I just got back from a long weekend in Portland for her birthday. Even that seemed more stressful than relaxing. Why is it that vacations always end up that way?I've also begun working on starting up my own little business, outside of etsy. Right now it's very grass-roots and I'm not even sure that it will go anywhere, but I'm toying with the idea. I'm getting a website (well, I should say a snazzy looking blogger account) set up and working on business cards. But it's really about time I get in the kitchen and start working on the actual product. Ultimately I'd like to work out of my kitchen this winter making cakes and goodies for the holidays for people here and there. But my ultimate goal is to find a commercial kitchen and be at the farmers market by this spring. Which has proven a bit of a challenge (I've been searching for one to no avail since June). So my mind has been pre-occupied by various ventures and thoughts. I like it that way, it's just been quite the juggling act the last couple of months. (P.S. Where did summer go? Here in the northwest we lost it sometime mid-august!)
Autumn is my favorite season. And I find myself drawn to the warmth, light and comfort of my kitchen on a daily basis. Although life is changing I'm hoping this aspect of it does not. My goal is to be back full force, creating, cooking, writing, photographing and blogging. You may see a vast array of sweet delights in the coming weeks and months as I begin to experiment with different recipes and decorating techniques. So, please stay tuned, I'm hoping autumn marks the beginning of something wonderful!
Onto the CAKE! What you've all been reading my ramblings for, right?
Nearly every year I make a german chocolate cake on August 24th. Why? Because it's Kevin's favorite (my mothers partner).
Generally his family throws a party for him and I bring the dessert. Last year I chose to make my "piece de resistance" cake, I was itching to do something different. Generally, I'll bake whatever a the birthday boy/girl wants, no matter how repetitive it is or not. But last year Kevin requested cheesecake, which I saw as license to create. So I did, an entire cheesecake in the center of a dense devils food chocolate cake. It fed nearly 40 people with leftovers to spare. Since last year I had free reign and there was no german chocolate in sight, I knew that would be the request this year. And I was right. Bored at the thought of making a "plain ol' cake" I decided to search for something a little bit different. After a short search on a few of my favorite websites I found a recipe for inside out german chocolate cake. After checking out the recipe I headed over to flickr to see if anyone had attempted this cake and what it looked like. I often check flickr out for ideas and recipes, because like bloggers, the reviews are straight from the general public. Plus, seeing what it looks like when a "regular joe" makes the cake and takes a picture vs. when a food stylists photographs it gives you a sense of what the recipe is really like (and how it can possibly be tweaked). So, after ample research I decided to try it out for myself. But before we go any further I am going to warn you, this cake takes the estimated 4-5 hours to make. Since I've been baking and decorating cakes on a weekly basis in my cake decorating class (and I've become quite the quickie pro) I figured this estimation was for people who don't make cakes as often. I thought I'd have the baby ready to go in an hour tops. Oh boy, was I wrong. There are several components to this cake, and these components take a while, no matter how good you are with a mixer and a stove. For example; the nuts and coconut have to be roasted, the caramel filling must bake in the oven in a water bath for about an hour and a half, and the frosting is applied in layers, at different cooling and re-heating temperatures. And in between all of this you whip up the batter, line the pans, and bake the cake. This is not a recipe for the weak of heart, or those short on time. I cut it a little too close myself and ended up applying the frosting in one gloppy coat, instead of a few at different temps. You will spend a lot of time in the kitchen with this recipe and you will have a bit of a mess to contend with afterwards.
So, the question remains, "is this cake worth it?"
Yes, and no.
This is not a german chocolate cake.
Why they call it that, I do not know.
Perhaps because the filling is the same as that which is traditionally found inside of a german chocolate cake.
However, the cake itself, is not made with german chocolate. It is made with unsweetened dutch-process cocoa powder.
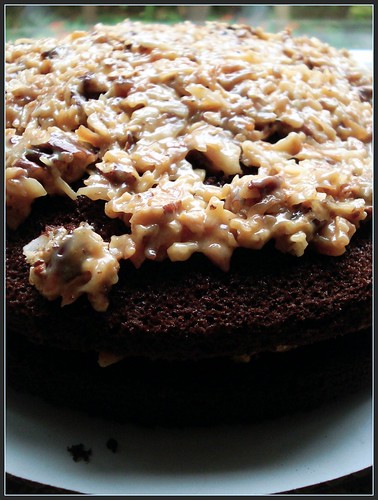
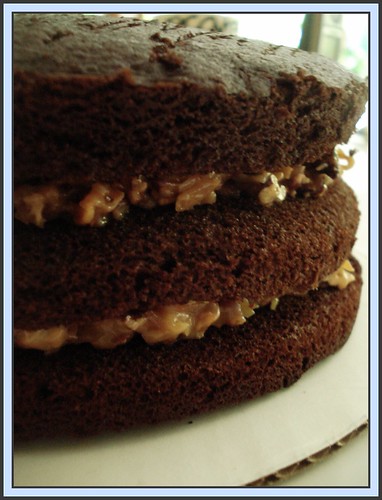
The cake itself is fairly moist, airy and delicious and pairs well with the sticky, crunchy, roasted/caramel-y center. I'd be inclined to call it something else, but what, at the moment I'm not sure.
Unfortunately, because I ran out of daylight and time to frost the cake, the finished product did not get photographed.
If you'd like to see the finished product made by people outside of Gourmet magazine check out flickr, there are various lovely photographs of "Inside Out German Chocolate Cake" there.
So if you're looking to spend a peaceful afternoon in the kitchen, and are looking for a recipe a little different and very special then I suggest this cake. It got rave reviews from everyone at the party and was devoured in a matter of minutes. I guarantee you'll get praise for your time spent in the kitchen (which, in my opinion, makes it all worth it).

Recipe: Inside Out German Chocolate Cake from Epicurious.com
For cake layers
1 1/2 cups sugar
1 1/2 cups all-purpose flour
1/2 cup plus 1 tablespoon unsweetened Dutch-process cocoa powder
3/4 teaspoon baking powder
3/4 teaspoon baking soda
3/4 teaspoon salt
3/4 cup whole milk
6 tablespoons unsalted butter, melted
1 large egg
1 large egg yolk
3/4 teaspoon vanilla
1/8 teaspoon almond extract
3/4 cup boiling-hot water
For filling
7 oz sweetened flaked coconut
4 oz coarsely chopped pecans (1 cup)
14-oz can sweetened condensed milk
1 tablespoon vanilla
For glaze
2 1/2 sticks unsalted butter
10 oz fine-quality semisweet chocolate, finely chopped
3 tablespoons light corn syrup
Special equipment: 3 (9-inch) round cake pans
Preparation
Make cake layers:
Preheat oven to 350°F and oil cake pans. Line bottoms of pans with rounds of parchment or wax paper. Sift together sugar, flour, cocoa powder, baking powder, baking soda, and salt into a large bowl. Whisk together whole milk, butter, whole egg, yolk, vanilla, and almond extract in another large bowl until just combined. Beat egg mixture into flour mixture with an electric mixer on low speed, then beat on high speed 1 minute. Reduce speed to low and beat in water until just combined (batter will be thin). Divide batter among cake pans (about 1 1/2 cups per pan) and bake in upper and lower thirds of oven, switching position of pans and rotating them 180 degrees halfway through baking, until a tester comes out clean, 20 to 25 minutes total.
Cool layers in pans on racks 15 minutes. Run a thin knife around edges of pans and invert layers onto racks. Carefully remove parchment or wax paper and cool layers completely.
Make filling:
Reduce oven temperature to 325°F.
Spread coconut in a large shallow baking pan and pecans in another. Bake pecans in upper third of oven and coconut in lower third, stirring occasionally, until golden, 12 to 18 minutes. Remove pans from oven.
Increase oven temperature to 425°F.
Pour condensed milk into a 9-inch deep-dish pie plate and cover tightly with foil. Bake milk in a water bath in middle of oven 45 minutes. Refill baking pan with water to reach halfway up pie plate and bake milk until thick and brown, about 45 minutes more. Remove pie plate from water bath.
Stir in coconut, pecans, and vanilla and keep warm, covered with foil.
Make glaze while milk is baking:
Melt butter in a 3-quart saucepan. Remove pan from heat and add chocolate and corn syrup, whisking until chocolate is melted. Transfer 1 cup glaze to a bowl, reserving remaining glaze at room temperature in pan. Chill glaze in bowl, stirring occasionally, until thickened and spreadable, about 1 hour.
Assemble cake:
Put 1 cake layer on a rack set over a baking pan (to catch excess glaze). Drop half of coconut filling by spoonfuls evenly over layer and gently spread with a wet spatula. Top with another cake layer and spread with remaining filling in same manner. Top with remaining cake layer and spread chilled glaze evenly over top and side of cake. Heat reserved glaze in pan over low heat, stirring, until glossy and pourable, about 1 minute. Pour glaze evenly over top of cake, making sure it coats sides. Shake rack gently to smooth glaze.
Chill cake until firm, about 1 hour. Transfer cake to a plate.